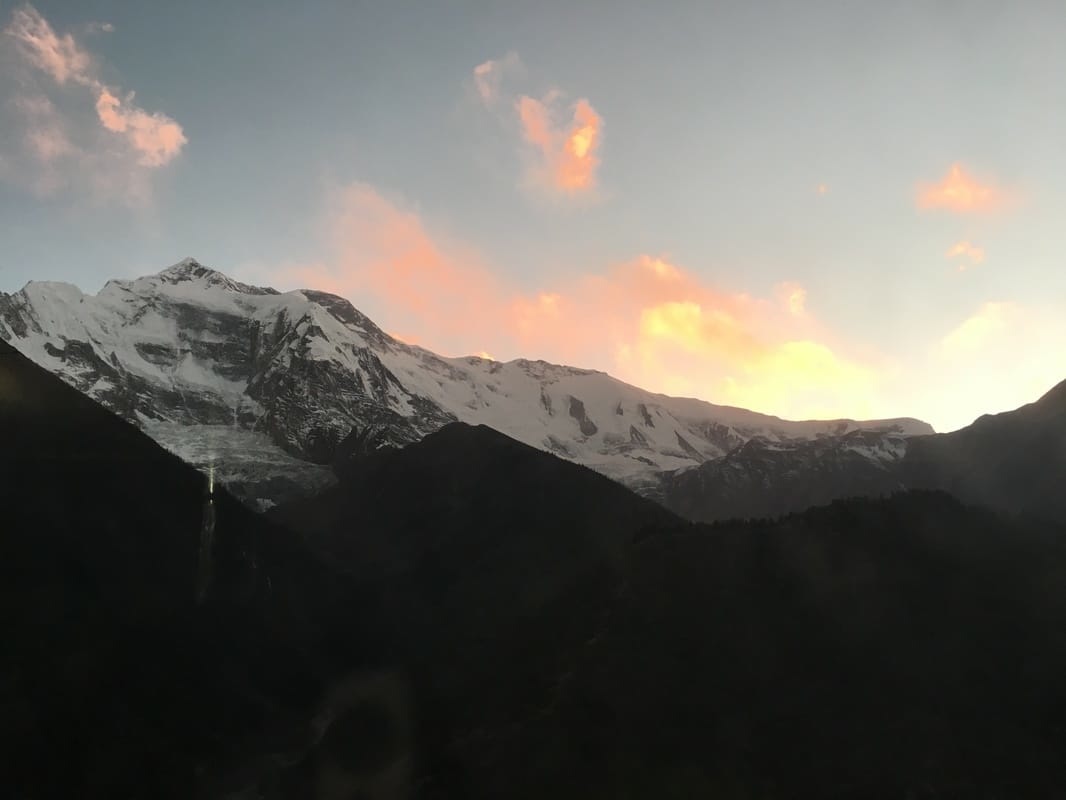
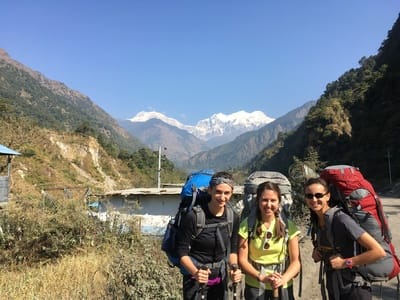
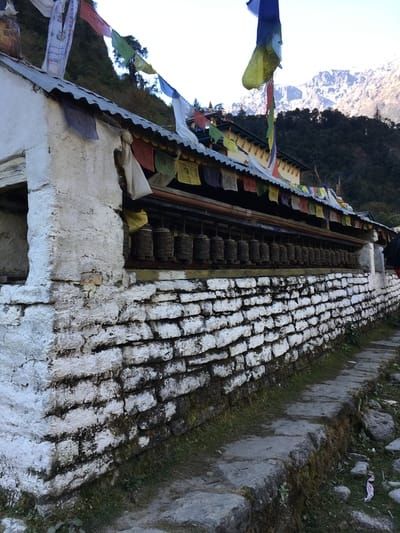
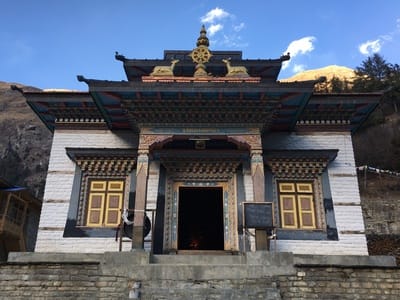
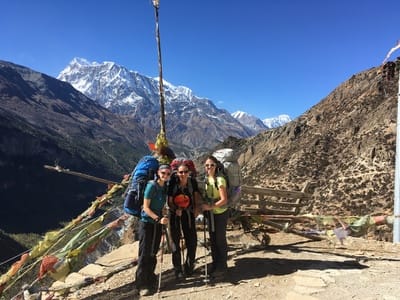
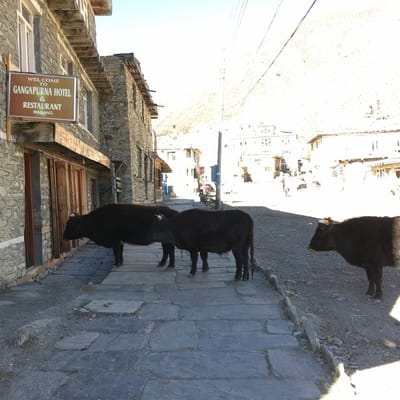
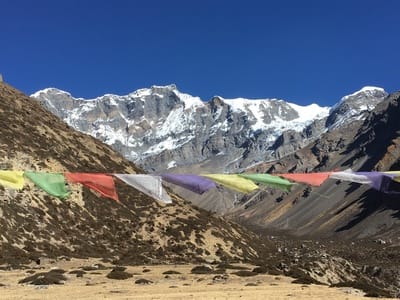
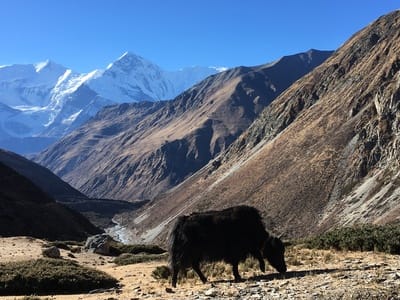
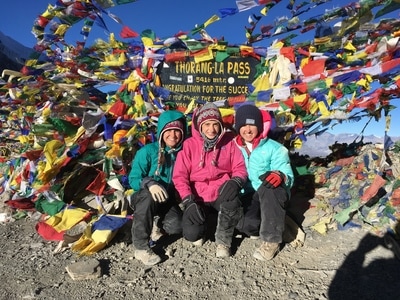
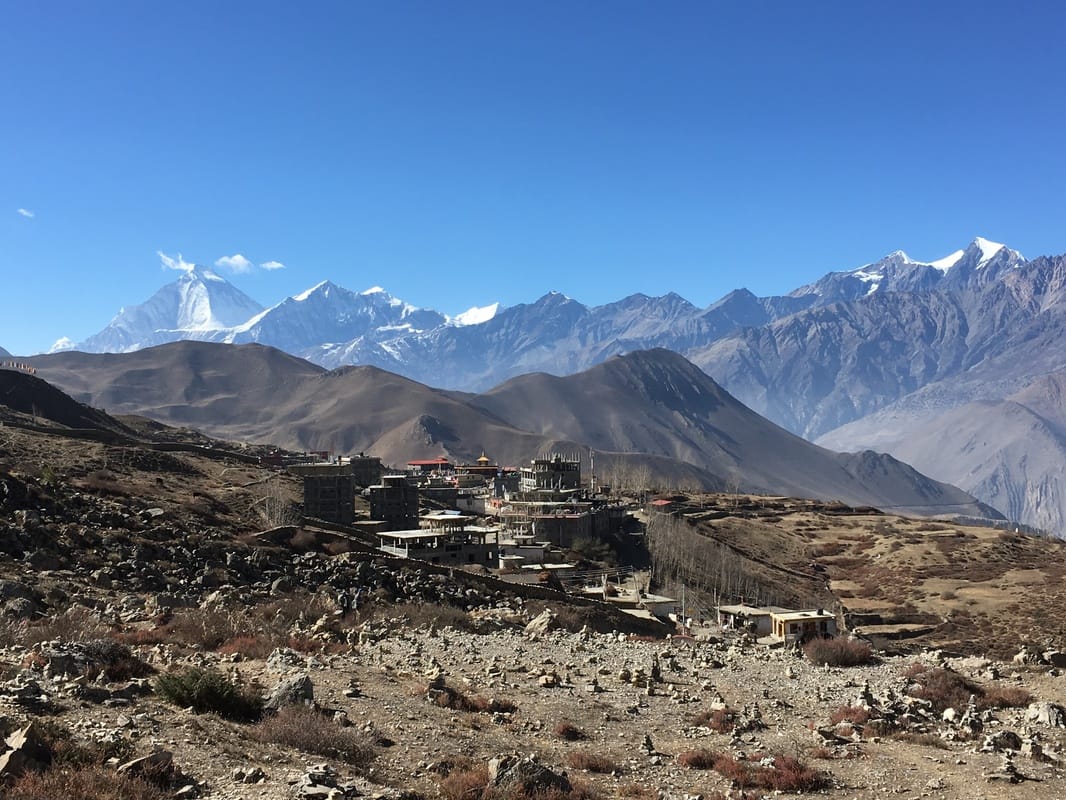
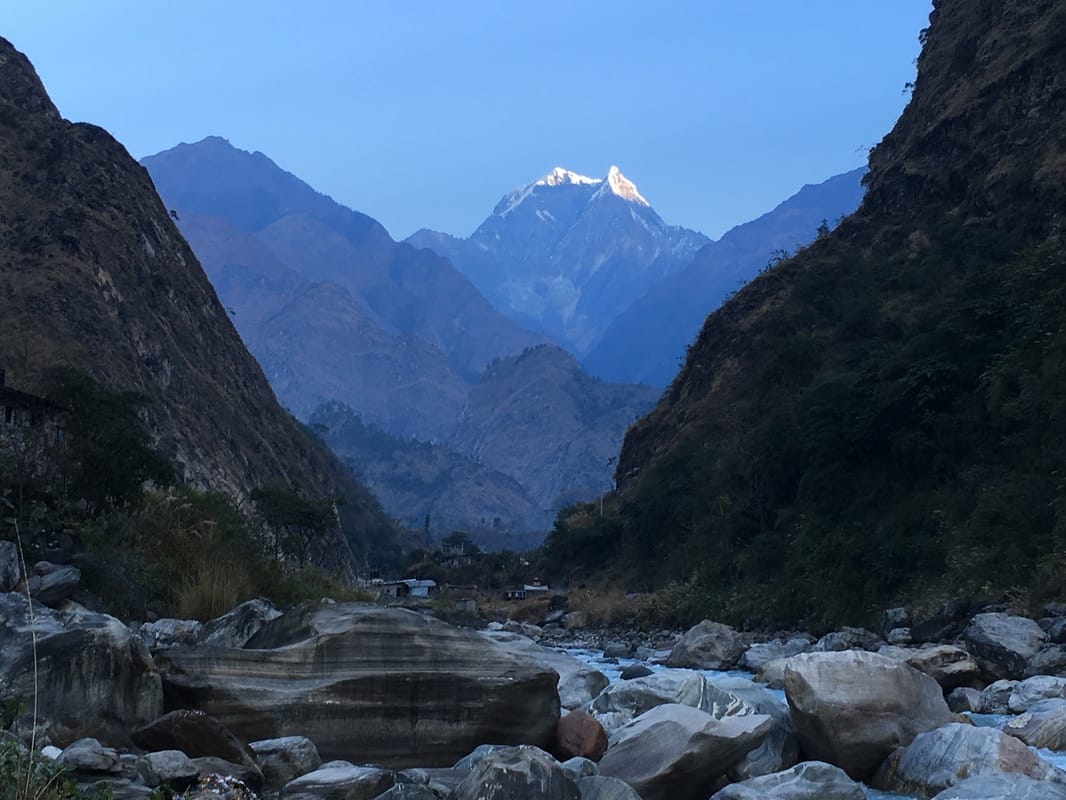
 Sunset and Annapurna II The reason we traveled all the way to Nepal was to trek the Annapurna Circuit, or "Round Annapurna" as the locals called it. The whole circuit takes about 20 days. We had two weeks off from work and, when we added in multiple days for flights and getting to the start of the trail, there was just no way to make the math work - we couldn't do the entire thing. So, we scoured the internet for information about which parts were must-see, which parts we could shorten, and how much we could pack into the little time we had. I have to say it: the whole thing is a must-see. Don't shorten it if you don't have to. We had to cut out much of the second half and now my friends and I are planning a trip back to complete the circuit and do the Annapurna Base Camp trek. I will add detailed posts about each day, the scenery, the distance and difficulty of hiking, and the teahouses where we stayed as I complete them! To get you started, this was our itinerary as we made our way Round Annapurna. Our 11 Day Itinerary on the Annapurna CircuitClick on a picture to read the blog post about that day's trek. Day 1: Pokhara to Ghermu (13 km) We took the earliest tourist bus out of Pokhara, departing at 6:30am. A bumpy 4-hour bus ride brought us to Besishahar, the official starting point for the Annapurna Circuit. To shorten the trek a bit on the front end, we took a jeep from Besishahar to Bhulbhule, cutting out 9 km of walking. We trekked from Bhulbhule to Ghermu (13 km), where we stayed the night. Day 2: Ghermu to Darapani (18 km) Our first full day on the trail was long and filled with steep stone steps. The steep stone steps really got me because your legs have to push your body weight plus your pack weight up over and over. I find a gradual uphill trudge to be easier, but I know that not everyone does. We passed through some really charming towns, following along the river, across suspension bridges, and past a beautiful waterfall. Just before Tal, we climbed steeply for quite awhile. But, after we descended, we stopped for lunch in Tal, at a pleasant garden teahouse with DELICIOUS food. Probably my favorite food we had on the circuit. From Tal, we continued about 2 hours to Darapani. Day 3: Darapani to Chame (16 km) Our third day, in my opinion, was easier than the second day. It was slightly shorter and, though we did some climbing, it seemed less intense than the previous day. Or my body was starting to get used to trekking day after day. Most of the towns that we passed through were quite small. We also got our first views of snow covered peaks today! We stopped in Chame, and there were many shops where we could buy things like hand sanitizer, snacks, and even clothing. I had major panic about being cold, so I bought a fleece-lined hat for less than $2.50 and a knock-off North Face long sleeved shirt for $7. It smelled like a plastic bag but made me feel better to have an extra long sleeved shirt. Day 4: Chame to Upper Pisang (14.5 km) One of my favorite days on the trail! The day started with a trek through pine forests, which smelled lovely, with the Marsyangdi River rushing along below us. We passed through an apple orchard, along the road with views of snow covered mountains constantly in sight, and through another dense forest. We stopped for lunch in Dhukur Pokhari, sitting in the sun with views of the mountains, and then continued to Upper Pisang for the night. When we trekked into Upper Pisang, we noticed that the village went up the hillside toward a monastery perched at the top. We also noticed that there were insane views of Annapurna II, and, tired as we were, we decided that we had to stay at the teahouse highest up on the hillside. The dining room had a fireplace to keep us warm and unobstructed views of Annapurna II. We dropped our packs and immediately went to visit the monastery. The entire day was wonderful, from the scenery to our leisurely lunch to the monastery to the views of Annapurna II as the sun went down. Day 5: Upper Pisang to Manag (19.5 km) There are two options to get to Manang: the Upper Pisang trail and the Lower Pisang trail. I'm not going to lie - the Upper Pisang trail was extremely challenging, but the views were amazing and the traditional villages along the way were interesting. Additionally, the upper trail is GREAT preparation for the steep climb to High Camp and over Thorong-La Pass. The trail ascends steeply between Upper Pisang and the next village, Ghyaru. It is a long slog with switchback after switchback, and I was really feeling the effect of the altitude on my breathing. But, at the top, there were amazing views of Annapurna II, III, and IV. Later on, to counter the ascent, there is a steep descent as you move toward Manang. At the end of this day, nobody in our group was speaking because we were so exhausted and were literally hobbling into Manang. But, I still think that the Upper Pisang route was worth it, especially since it is followed by a rest day. Day 6: Rest Day in Manang (0 km) The rest day in Manang was glorious. We didn't have to pick up our packs at all. We went to one of the bakeries to have coffee and tea, met fellow trekkers, and saw a movie. Day 7: Manang to Letdar (10 km) This day went very quickly for us, as it was considerably shorter than the previous trekking days we had done. The landscape was stark and barren, and we passed by some Maoist graffiti. In Letdar, we had finally reached the place where we were no longer connected to the outside world by technology. There was no wi-fi at our lodge in Letdar, but we spent a fun afternoon and evening chatting with our fellow trekkers and soaking up the warmth from the fireplace in the dining room. Letdar was the first place where we had a really lively crowd in the dining room at night, most likely due to the lack of lodging options. Day 8: Letdar to High Camp (6 km) Once again, our day seemed super short in comparison with earlier days on the trail, but we had to keep the mileage short in order to ensure that we did not gain too much elevation too quickly. Between Letdar and Thorong Phedi, we passed through a landslide area, which made me nervous initially, but we didn't see a single rock falling or sliding. We rested in Thorong Phedi for a short while before tackling the final push to High Camp. As I mentioned before, I was extremely grateful that we had done the Upper Pisang trail because this section (Thorong Phedi to High Camp) was very similar, steep with switchback after switchback. We knew how to tackle it after completing the Upper Pisang trail, slow and steady with breaks to catch our breath. We arrived in High Camp before noon and spent all afternoon and night in the dining room, hanging out with our trail friends. Day 9: Crossing Thorong-La Pass: High Camp to Muktinath (15 km) Crossing Thorong-La Pass seems to be the pinnacle of the Circuit, what everyone had been working toward as we climbed day after day, higher and higher. A very long day, we woke up around 4:00am, ate breakfast, put on all our warmest clothes, and hit the trail by 5:30am, in order to cross the pass before 10:00am when the winds pick up. The ascent was tough and cold and I once again felt the effects of altitude on breathing. I didn't realize at the time that I also had a cold, which was making it even more difficult to catch my breath. We reached the pass by about 8:00am, quicker than the time estimates, and it felt joyful to know that we had reached the top of the Annapurna Circuit. On top of the pass, we encountered most of our trail friends, took lots of pictures by the sign, and strung prayer flags, all while we tried to stay warm. From there, we spent the rest of the day descending and shedding layer after layer of warm clothing until we reached Muktinath, a holy city for Hindus and Buddhists, where we relaxed and took hot showers. Day 10: Muktinath to Tatopani by Jeep It was very strange to have completed our walking on the Annapurna Circuit. I didn't want to be done, but we had to start making our way back. Initially, we thought, "There's no way that it will take two full days to get back to Pokhara." Then, we experienced transportation in rural Nepal. We should have gone to the jeep stand a lot earlier in the day. As it was, we caught a jeep to Jomsom at 11:30am with 9 other trekkers, so we were able to split the cost. In Jomsom, we had to wait for the jeep drivers to finish lunch before we could get another jeep to Tatopani. We arrived in Tatopani about 7 hours later - 2 hours to Jomsom, waiting in Jomson, 4.5 hours to Tatopani. Day 11: Tatopani to Pokhara by Bus & Jeep On Day 11, we officially left the Annapurna Conservation Area. We took a local bus (rookie mistake) to Beni and had to put up with attempts to rip off the tourists as well as a bus ride that was reminiscent of riding a mechanical bull. There was literally a Nepalese man vomiting out the window in front of me. That bus left at 8:30am-ish and the ride took about 4 hours. From Beni, we paid for another jeep for the final leg to Pokhara, where we arrived about 3 hours later, bruised and exhausted from the bus and jeep rides. 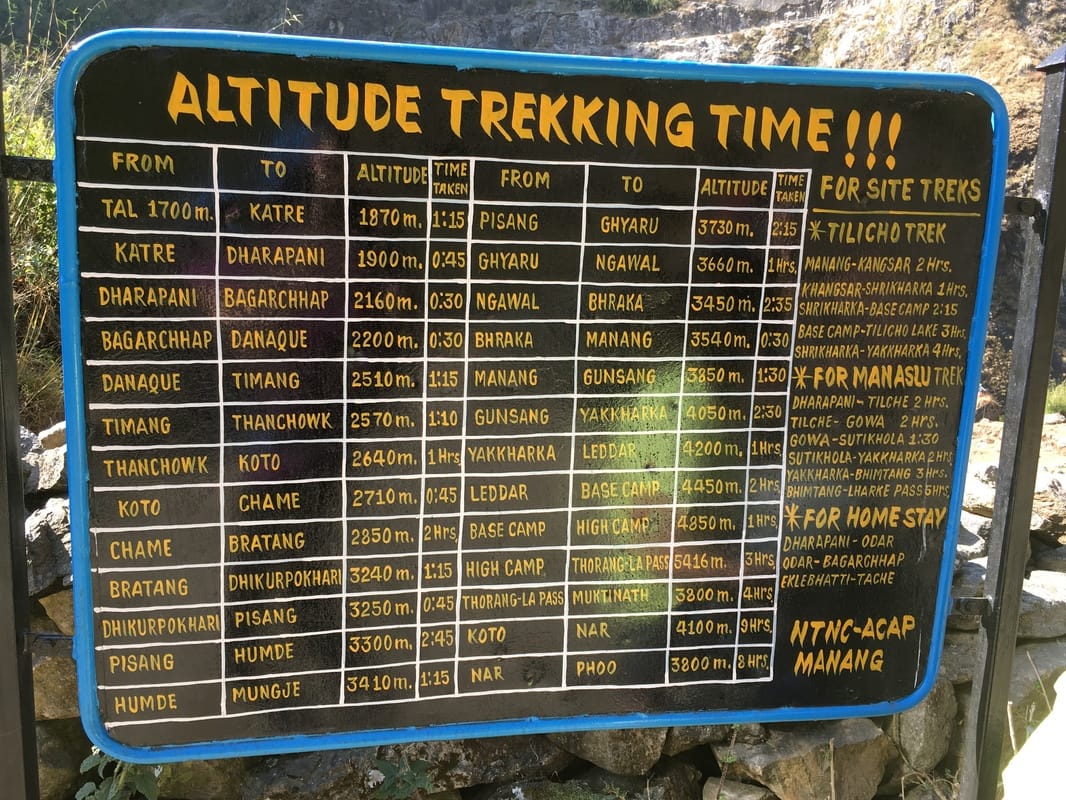 This sign was eerily accurate in its trekking time estimates. We referred to it constantly. 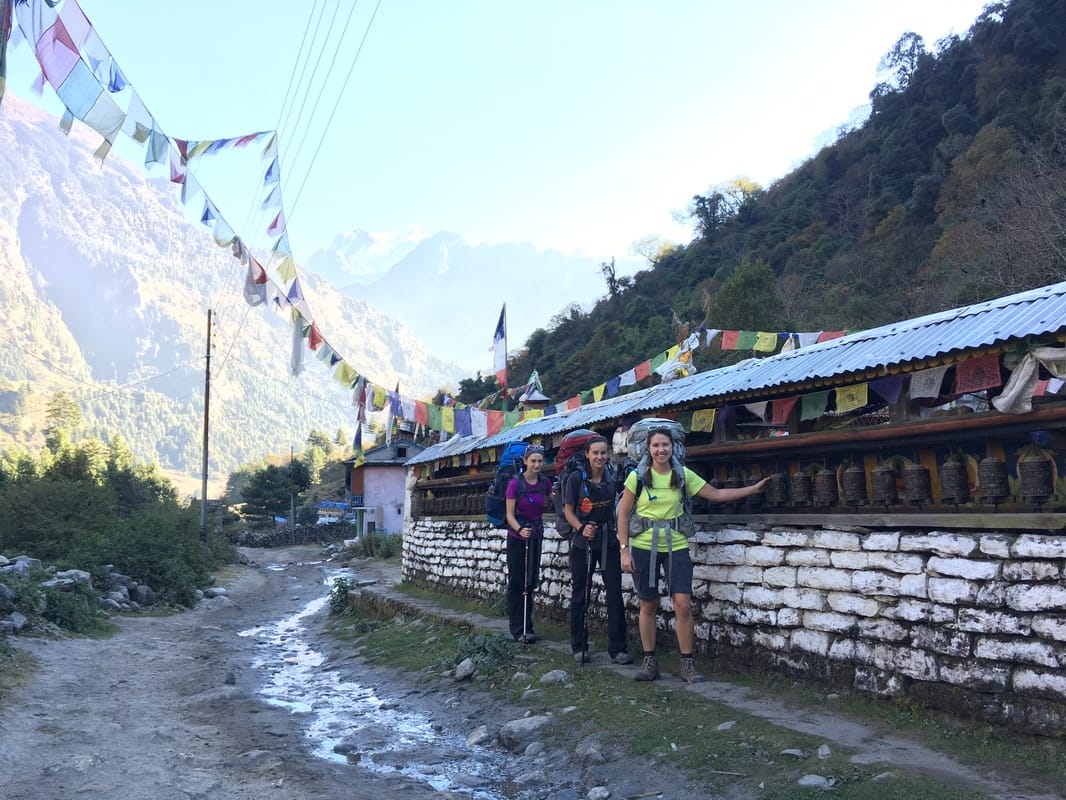 Trekking past prayer wheels on the Annapurna Circuit
0 Comments
Day 1: SantiagoOur group of friends flew overnight from the US to Santiago, Chile, arriving in the morning. We spent the rest of the day exploring Santiago. Opting to walk around and just see what we saw, we wandered into the Santiago Museum of Contemporary Art. As the workers were on strike, we were able to just walk in, with the option to donate to the museum in lieu of the typical entrance fee. One of the best experiences of the day was climbing up Santa Lucia Hill, a hill in the middle of Santiago with great views over the city. Accommodation: The Princesa Insolente Hostel Santiago Day 2: Travel to Puerto Natales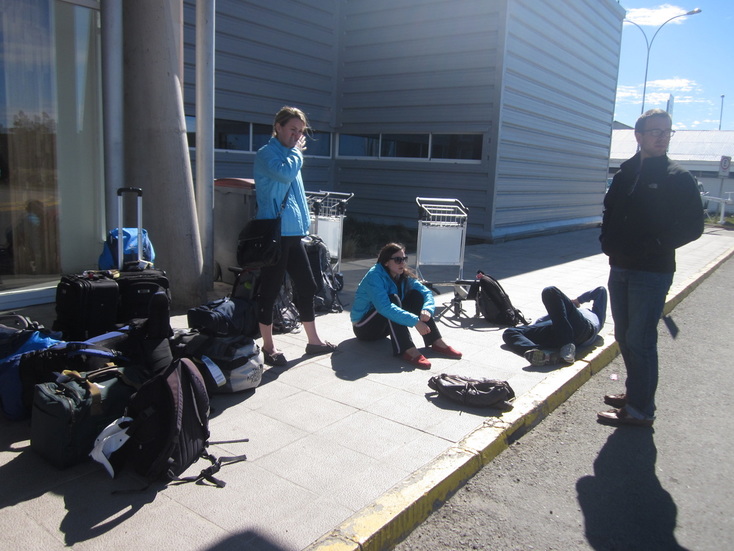 In order to access Torres del Paine National Park, we needed to fly to Chilean Patagonia, which meant an in-country flight to Punta Arenas and a bus ride to Puerto Natales. Punta Arenas has the main airport for Chilean Patagonia, and it's located about 3 hours from Puerto Natales. We woke up before early to get our flight down south. When we arrived, we were assured that a bus headed to Puerto Natales would soon arrive. Now the Punta Arenas airport only has three gates, and, as we waited on the curb, we watched our flight crew, airport workers, and other people slowly trickle out of the airport until we were basically the only people at the airport. But, we remained on the curb, confident that some sort of bus would eventually show up. Over an hour later, we hopped on a bus headed to Puerto Natales. It cost approximately $5, and we all promptly reclined our seats for a nap. The bus pulled into Puerto Natales and dropped us near our hostel. That afternoon, we checked in, attended the (free) Erratic Rock info session on trekking in Torres del Paine, rented a few pieces of gear, and shopped for food. That night, we packed our backpacks, prepared to leave on the morning bus for Torres del Paine to begin the W-Circuit. Accommodation: Erratic Rock Hostel **At Erratic Rock, we got a free information session (open to all), ate a delicious home-cooked breakfast, and were able to store our luggage at the hostel for the entire length of our hike. Winner in my book. Day 3: W-Circuit, Torres del Paine National Park Our first day of hiking! We took a 7:30am bus from Puerto Natales to the park. We were able to purchase bus tickets to the park from the hostel, which made the morning easy. The bus stopped to let us pay our entrance fee before dropping us by the catamaran. We wanted to trek west to east, so we had to start by taking the catamaran across Lago Pehoe to the start of our trek. The first day, we hiked to Refugio Gray, past Glacier Gray. For a rundown of our hike and the distances, see my Hiking Torres del Paine National Park post. Accommodation: Camping near Refugio Gray Day 4: W-Circuit, Torres del Paine National Park Our second day of trekking in Torres del Paine National Park involved retracing our steps and continuing on to Camp Italiano. For a rundown of our hike and the distances, see my Hiking Torres del Paine National Park post. Accommodation: Camping at Camp Italiano Day 5: W-Circuit, Torres del Paine National Park The third day of the W-Circuit involved a trek into the French Valley and then back out to our campsite at Los Cuernos. For a rundown of our hike and the distances, see my Hiking Torres del Paine National Park post. Accommodation: Camping at Los Cuernos Day 6: W-Circuit, Torres del Paine National Park Day number four brought us to the base of the Torres del Paine. We camped at Campamento Torres, in order to wake up early and see the sunrise at the towers. For a rundown of our hike and the distances, see my Hiking Torres del Paine National Park post. Accommodation: Camping at Campamento Torres Day 7: W-Circuit, Torres del Paine National Park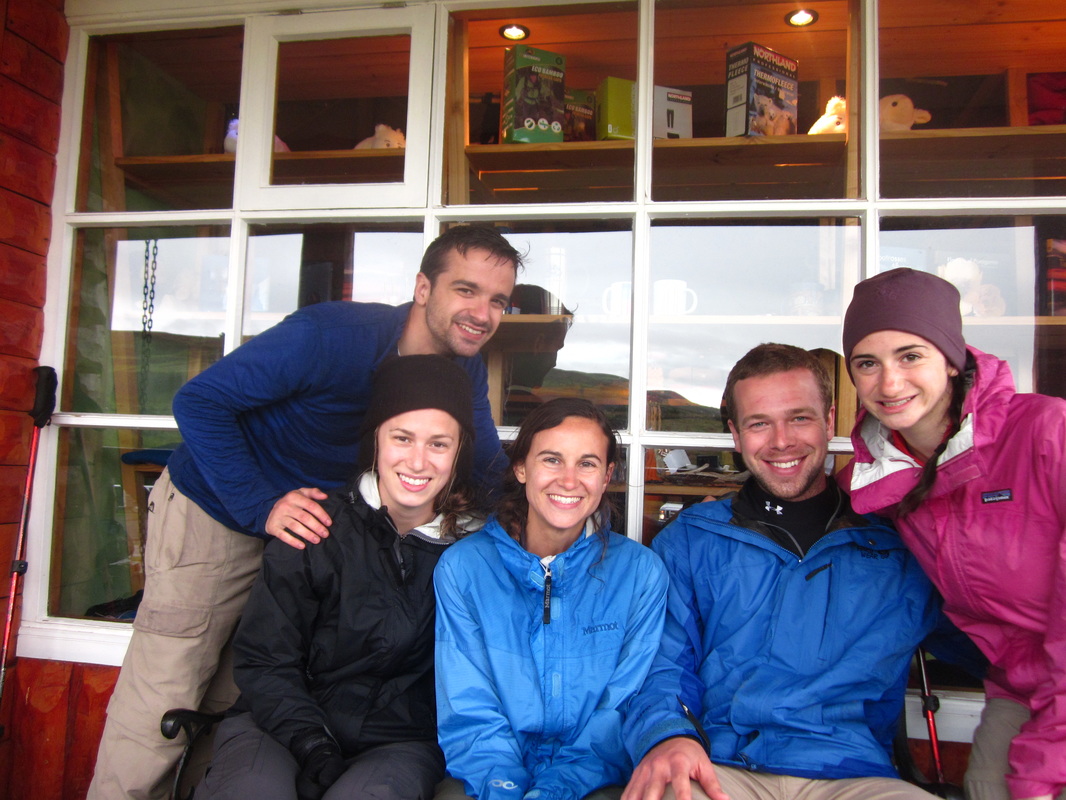 Our last day of hiking in the national park, intended to be our opportunity to see the famous Torres del Paine. We hiked out and caught a bus back to Puerto Natales, where we warmed up with hot showers, pizza, and wine. For a rundown of our hike, why we didn't actually see the Torres, and the distances, see my Hiking Torres del Paine National Park post. Accommodation: Erratic Rock Hostel Day 8: Puerto Natales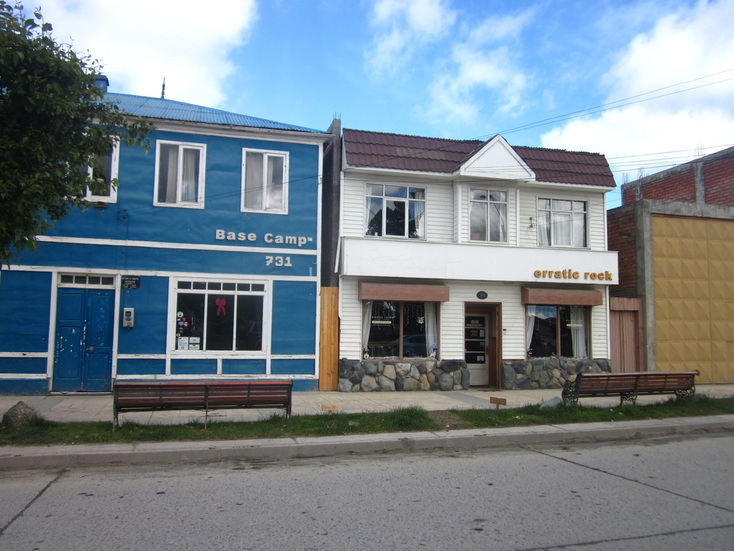 We built in a rest day in Puerto Natales, thinking we could either leave a day later and use it to prepare before the hike or rest post-hike. Ultimately, we were so excited to start trekking that we took our rest day after the five day W-Circuit...and, boy, am I glad that we did! Our day in Peurto Natales involved sleeping in, eating a homemade breakfast at the hostel, reading and journaling, doing laundry so that our hiking clothes weren't smelly, wandering around town, grabbing some hot chocolate at Patagonia Dulce, and enjoying a leisurely dinner with views of the water. Accommodation: Erratic Rock Hostel Day 9: Estancia Cerro Guido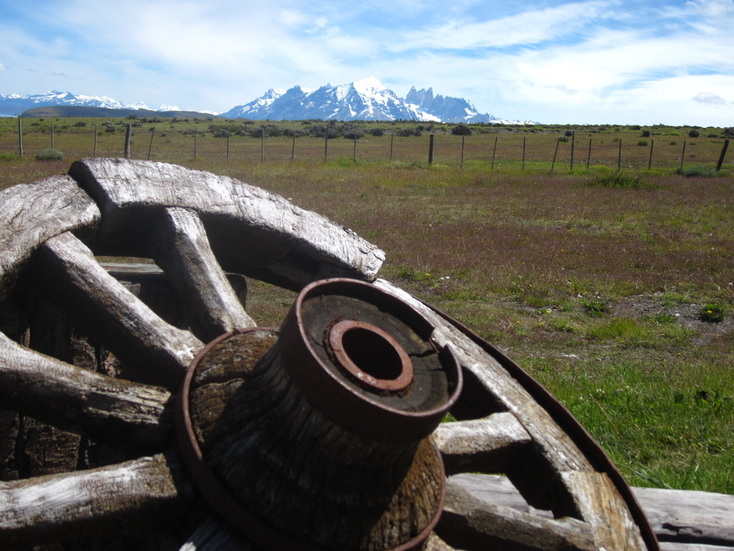 After securing a rental car, we headed out to Estancia Cerro Guido, a ranch with views of Torres del Paine. Renting a car seems to be the only way to get to the estancia, since it's far away from any other towns. For more about the accommodations, activities, and my thoughts on our stay, refer to my Estancia Cerro Guido blog post. Accommodation: Estancia Cerro Guido Day 10: Estancia Cerro Guido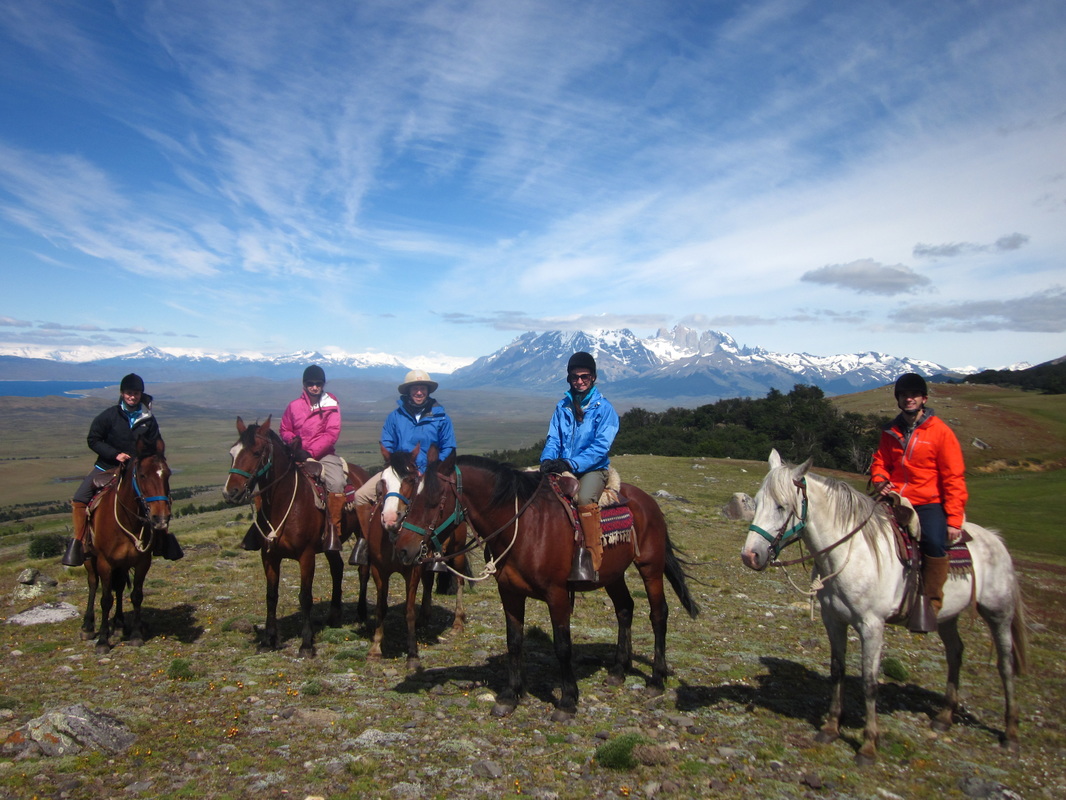 This was our full day on the estancia.We wanted to make sure that we spent at least one full day at Estancia Cerro Guido, particularly since it wasn't easy to access. Our morning was occupied with a horseback riding tour of the estancia property, with views of Torres del Paine National Park in the distance, while our afternoon was a relaxing mix of walking, napping, and reading. At night, we enjoyed a leisurely dinner with friends and amazing food. For more about the accommodations, activities, and my thoughts on our stay, refer to my Estancia Cerro Guido blog post. Accommodation: Estancia Cerro Guido Day 11: Travel to Punta Arenas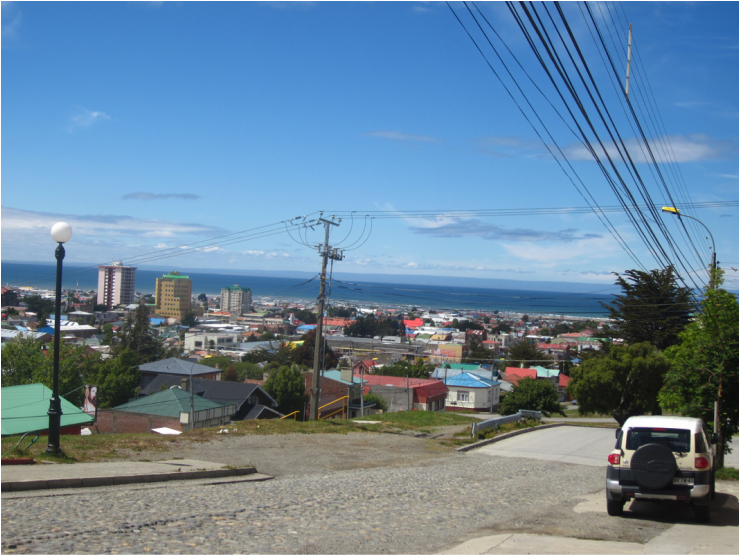 In order to fly back to the United States, we had to make our way to Punta Arenas for a flight to Santiago. So, we drove the rental car to Punta Arenas, a city just north of the Strait of Magellan, where we returned it and spent the rest of the day exploring the city. We checked out a few shops and met up with a fellow backpacker that we had met in Torres del Paine for dinner. Accommodation: Hotel Boutique Antarctica Day 12: Fly home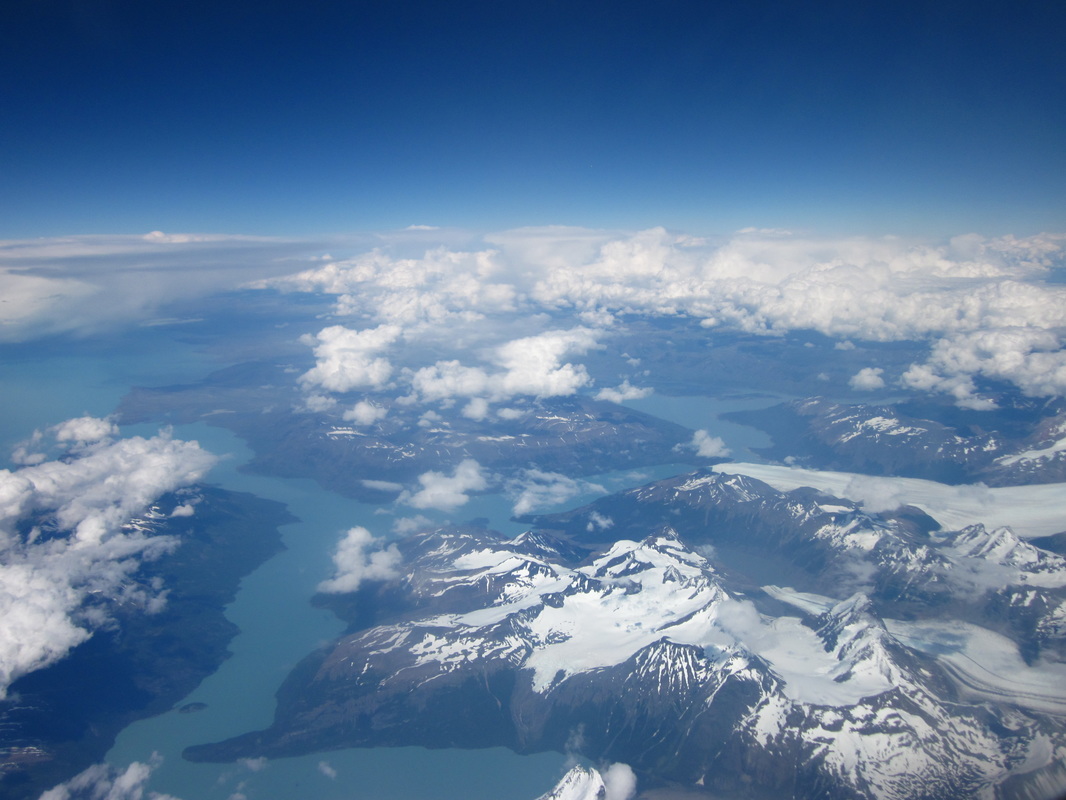 Adios, Chile! We flew from Punta Arenas to Santiago, Santiago to the USA. 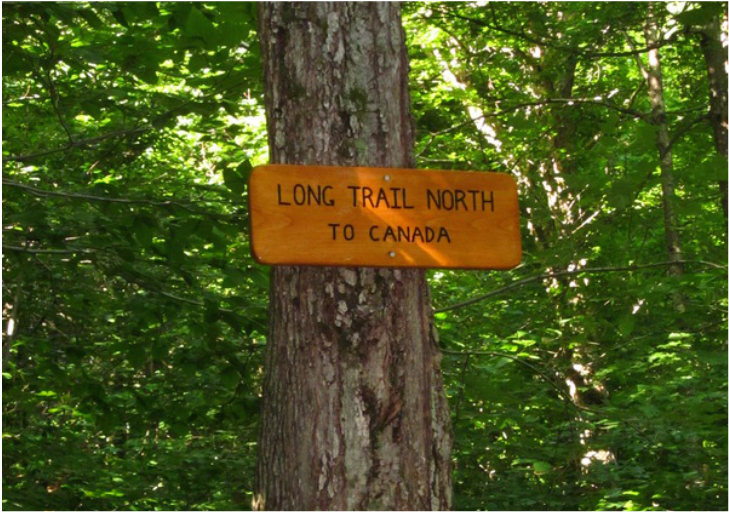 1. The BasicsEveryone in Vermont knows the Long Trail. There is even a brewery named Long Trail Brewery. But none of my friends outside Vermont, not even avid hikers, were familiar with the Long Trail. So, here are the basics. It's America's first long-distance trail, maintained by the Green Mountain Club. It runs the length of the state, north to south, with the southern 100 miles matching up with the Appalachian Trail. The guide book that I bought had the tagline "Hiking Vermont's High Ridge", meaning that you get to traverse Vermont's highest mountains and many of it's lower peaks.  2. "The Long Trail is Hard!"Or, as one of the caretakers we met along the way commented, "The Long Trial is gnarly, man!" If you had been on a certain section of the Long Trail between Appalachian Gap and Mount Mansfield at the same time as my friend, Ciara, and me, you would have heard us exclaiming about the Long Trail's difficulty over and over. Ciara, an avid backpacker since she was 14, has trekked in the Rockies, the Appalachians, Patagonia, etc., and she thought the Long Trail was quite challenging. The reasons for this were much debated along the way. Here's what we landed on. First, the trail was constantly ascending or descending, most of the time quite steeply. On the section of the trail that we hiked, we very rarely had flat or gently sloping ground. On the contrary, we spent a good chunk of our time looking for foot holds and hanging on trees for support as we scrambled up or down boulders. Also, much of the trail in our section was covered by rock, and given the weather (discussed in #4), the rock was wet and slippery, requiring much concentration and careful foot placement. 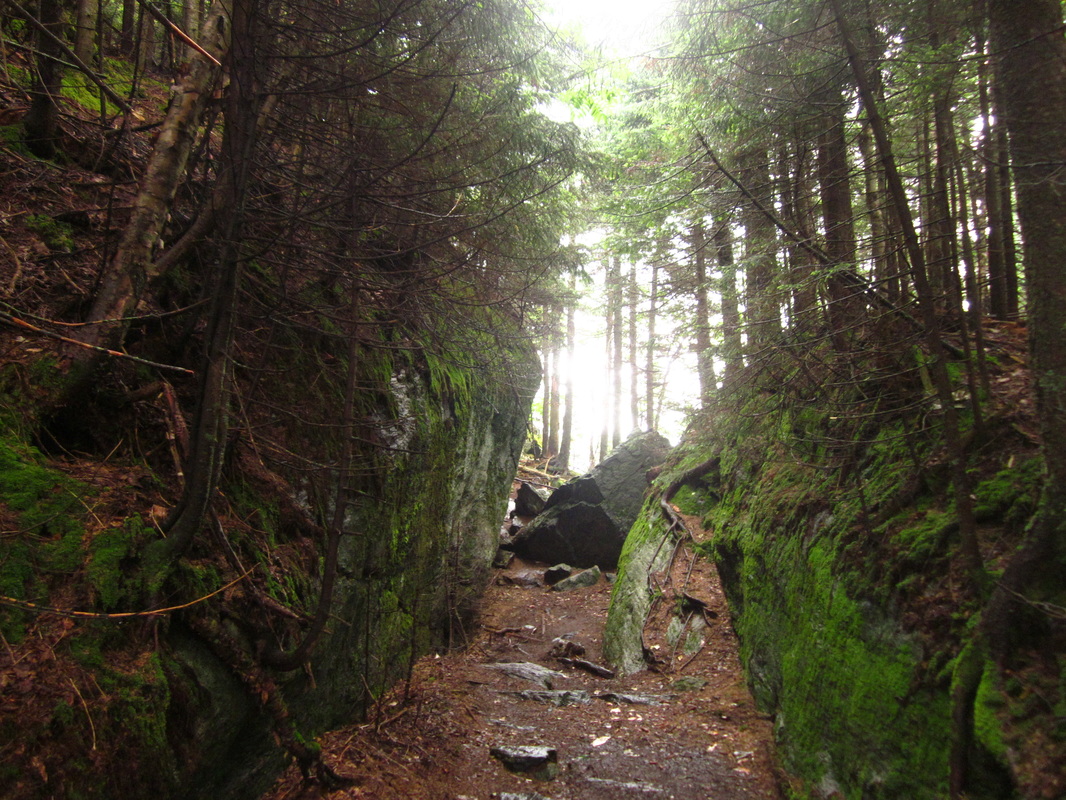 3. Plan for shorter distances than you think you can coverGiven that we both had previous hiking experience, we had planned our section of the Long Trail based on distances we were able to cover during previous backpacking trips. We found that we had grossly underestimated the trail. The thing about the Long Trail is that, because we were always steeply ascending or descending, we spent a lot of time and energy scrambling up/down rocks, only to realize that we had gone less than a quarter of a mile. Typically able to hike 2-3 miles per hour, Ciara and I found ourselves going more like 1 mile per hour. There was a point when we had to completely rethink our plan because we realized, at that pace, we wouldn't make it until the next trail shelter until after 11:00pm. If you plan for shorter distances, you can always head to the next shelter if you are hiking faster than planned, which is way easier than revamping your plan shortly before nightfall. 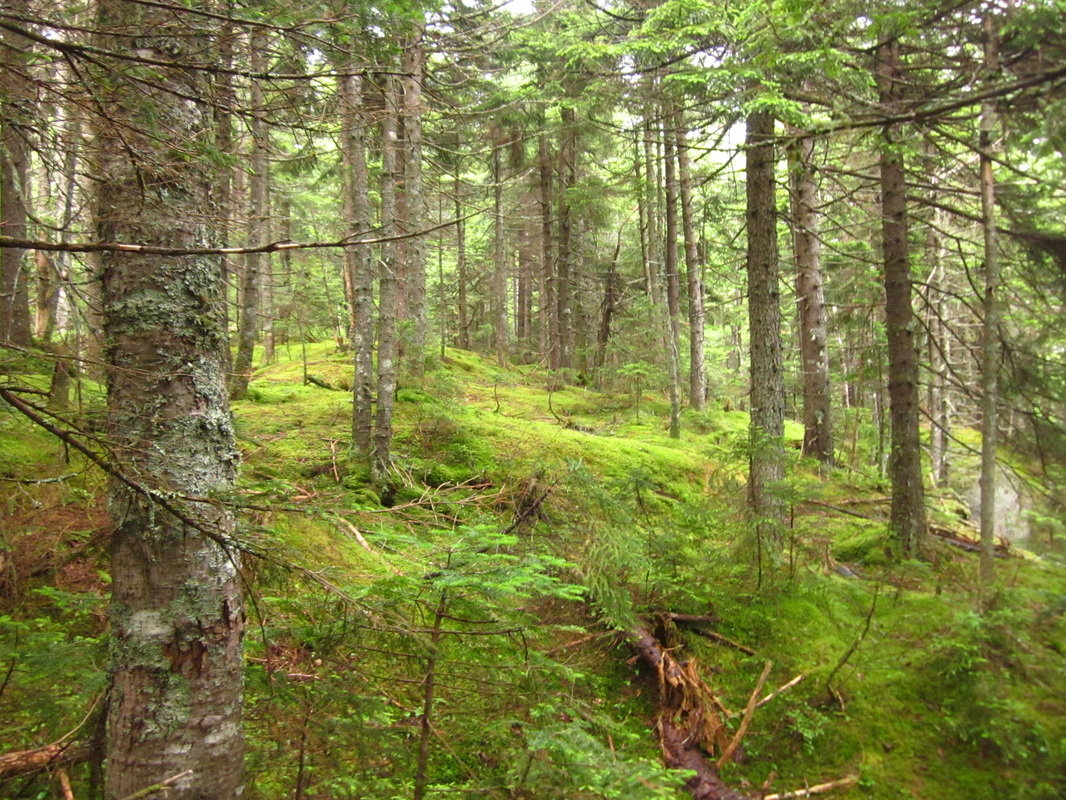 4. Don't underestimate the weatherOn the Long Trail, we encountered bright sunshine, high winds, near-freezing temperatures, rain showers, thunderstorms, and rumors of hail. All in one day. Vermont's weather is notoriously volatile. Be prepared with a rain jacket, extra layers for warmth, a pack cover (something yours truly completely forgot), and a warm-sleeping bag. My 30 degree bag was never too warm for me, and, one morning, I woke up to temperatures in the 30s. The on-again, off-again rain showers had a big impact on our hike, as it made the rock on the trail slippery, though Ciara and I usually welcomed the drizzle, which cooled us off as we hiked. 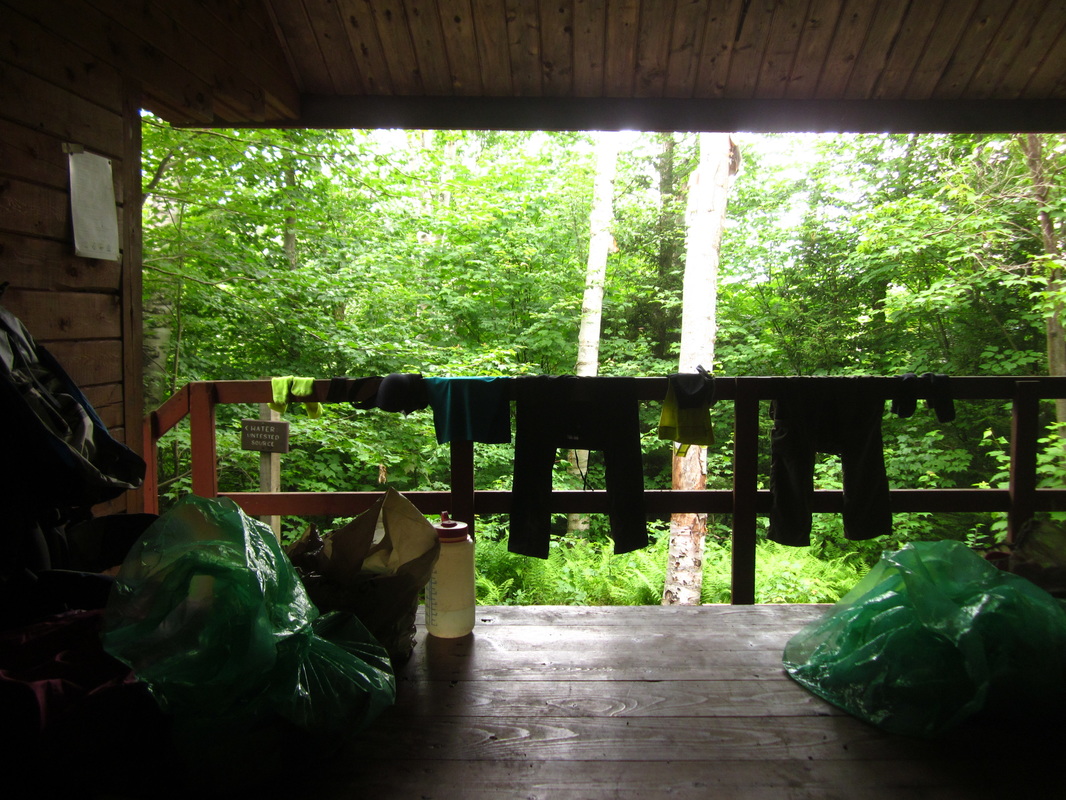 5. There are trail sheltersWe did not carry a tent on the Long Trail because there are trail shelters that you can use for sleeping. There are many websites that recommend carrying a tent, just in case the shelters are full. Most of the shelters that we encountered were lean-tos, with one side open to the woods, while a few "lodges" are completely enclosed. In the lean-tos, there were long, raised sleeping platforms, as well as hooks and strings on the ceiling to hang food/packs/etc. In the lodge, there was an upper platform and a lower platform stretching across the width of the cabin, like really wide bunk beds. Though it was mid-July when we were hiking, Ciara and I never had difficulty finding a spot in the shelters, since we rarely encountered others along the trail. I loved our night at Bamforth Ridge Shelter - the only "crowded" night on our trek, thanks to a group of ten pre-teen boys and their two group leaders. The boys and their leaders ended up taking the tent platforms, while Ciara and I shared the shelter with a pair of college boys. The shelter was open to the woods, and it stormed that night. We were able to snuggle into our sleeping bags and fall asleep with the sound of rain on the shelter roof. BE WARNED: Come prepared with a mosquito protection plan for sleeping in the shelters. Even the enclosed lodges don't keep mosquitoes out completely. I had so many bites on my neck and ears at the end of our trip. I wished that I had brought some sort of netting as protection. 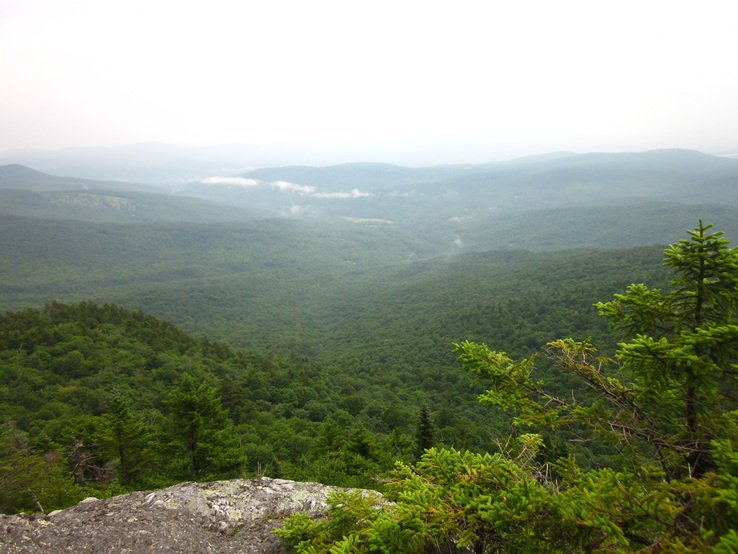 6. It's absolutely beautifulVermont is so lushly green that it almost doesn't seem real. Can the color green really be that vibrant? (The answer is yes!) The Long Trail combines mountain views with lots of forest walking, unlike some trails where you have constant views of the surrounding peaks. The forested portions of the trail were never boring, as we were searching for footholds half the time and came across scenic overlooks often enough. We typically stopped for a snack and a rest while soaking in the views. On our second day, we walked along Bamforth Ridge, which was an exposed ridge and gave us an extended view of the Green Mountains. During the third day on the trail, we rested by a beautiful stream, so peaceful that we ended up staying for a snack and journaling. Add in 360 degree views from the summit of Vermont's highest mountains - Camel's Hump and Mount Mansfield - to make for varied scenery that's interesting and enchanting. 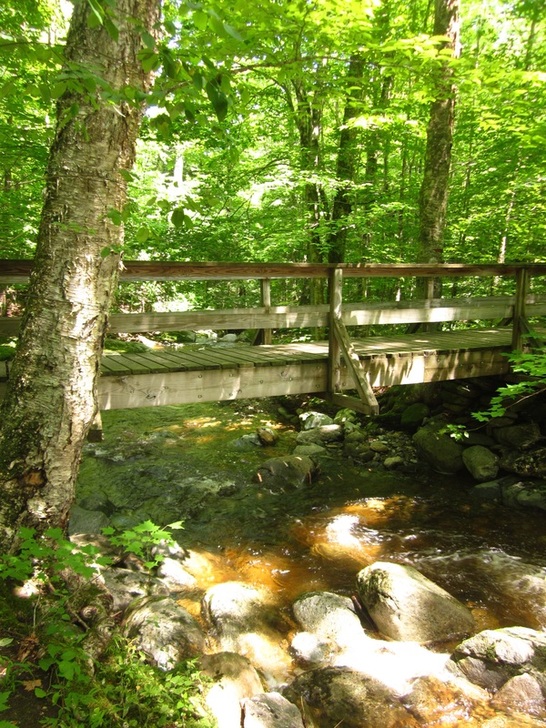  What comes to mind when you read the words "The Kingdom"? Personally, I imagine armies of knights on horseback defending a walled city. The Northeast Kingdom, often referred to by Vermonters as simply "The Kingdom", is nothing like that. The Northeast Kingdom covers the northeastern corner of the state of Vermont. It is rural, mountainous, and breathtakingly beautiful. The area is sparsely populated by people and densely populated by trees. We have learned that The Kingdom is the place in Vermont to "get away", whether that involves pitching your tent at a campground, fishing at a lake house, or vacationing with the whole family at a lodge. It feels worlds away from Burlington, not a huge city itself, though The Northeast Kingdom is only a few hours away by car. 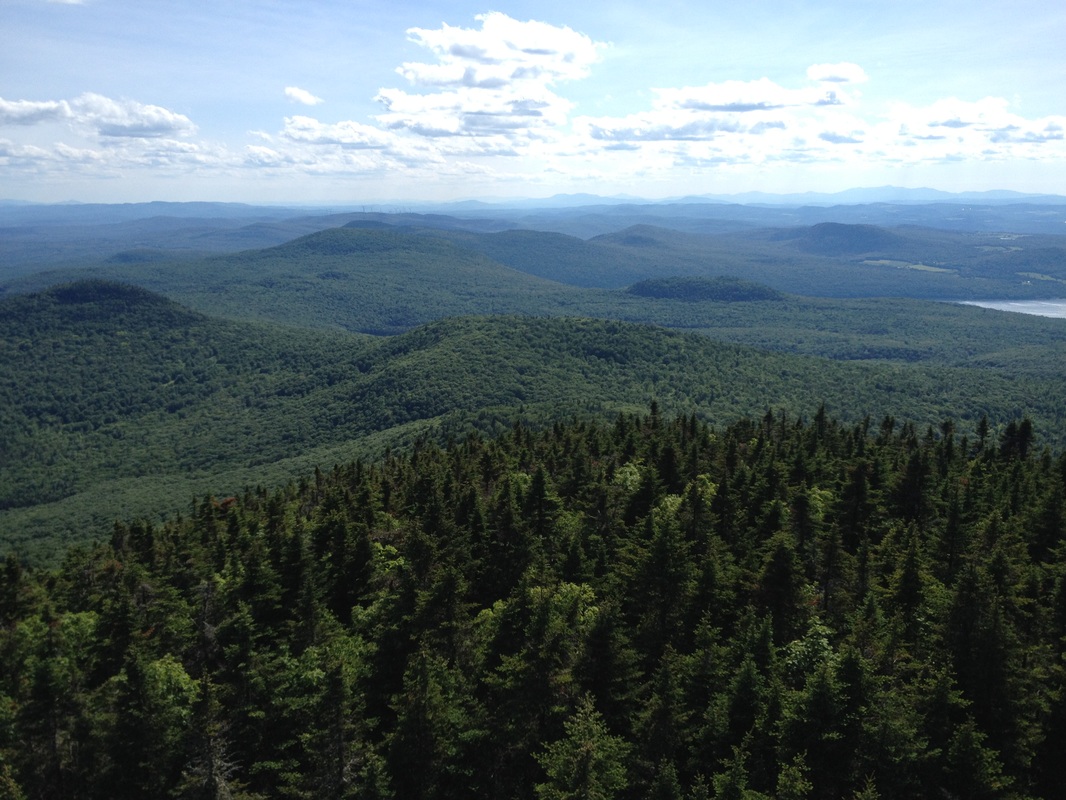 View from the top of Bald Mountain, Northeast Kingdom, Vermont Brett and I, freshly equipped with camping gear from our wedding registry (Thanks fellow REI fans!), were determined to plan a camping trip during our Vermont summer. The idea to camp in The Kingdom grew organically out of Brett's desire to visit Hill Farmstead Brewery, considered one of the best craft breweries in the world, located in middle-of-nowhere Vermont. One of Brett's co-workers described the route to Hill Farmstead: "You keep going until you're in the middle-of-nowhere and you think you must be going the wrong way, and that's how you know you're going the right way." We figured that we might as well drive up to Hill Farmstead, visit the brewery, camp overnight, and enjoy some hiking. Eventually, our plan was foiled by the weather, as happens to many good plans. It was supposed to rain Sunday, but Saturday was a glorious, sunny, blue-sky day. Rather than spend our one nice day waiting for beer, Brett opted to go hiking on Saturday to enjoy the natural beauty of the Northeast Kingdom. This meant forgoing the opportunity to visit Hill Farmstead, since the brewery is closed on Sundays. He assured me that this was fine, so, after checking in to a campground, we set off for a hike up Bald Mountain. 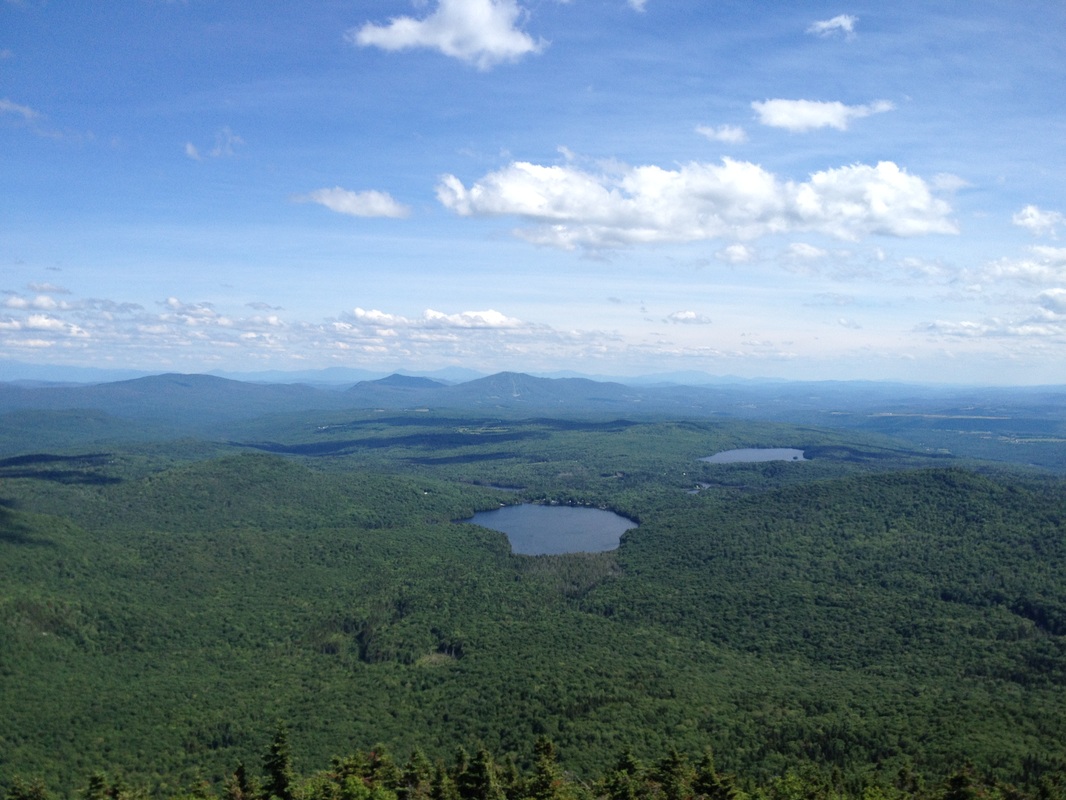 View from the top of Bald Mountain, Northeast Kingdom, Vermont 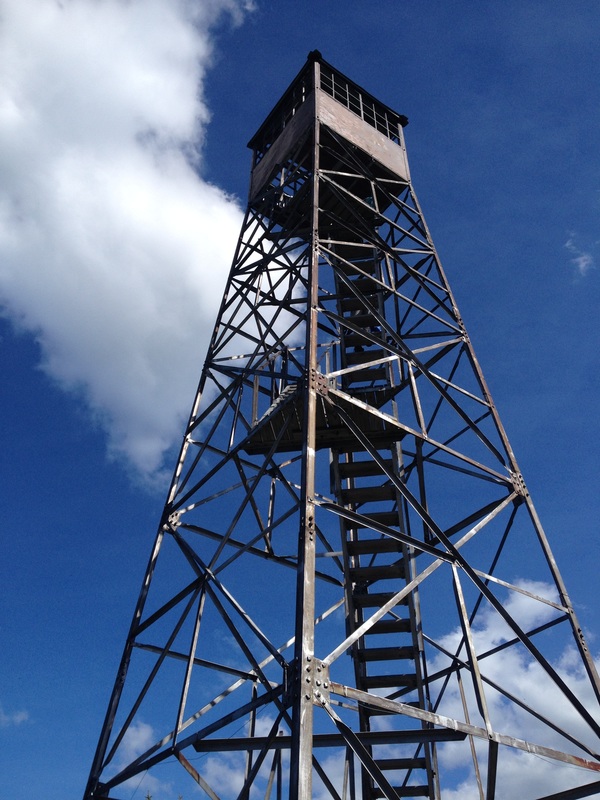 Fire tower on Bald Mountain, Northeast Kingdom, Vermont The Bald Mountain trail came up on my AllTrails app as "easy", but I feel confident that this was a mistake, especially given that the AllTrails website rates it as "difficult". I would rate it moderate to difficult. Though it requires no technical skill to climb, the top half of the trail is quite steep and rocky. I had to be extremely careful with my footing at points. It is just over 2 miles to the top, but the trail is well-marked and well-maintained. My husband, who hikes less often than me, found it very challenging, but we made it to the top! The summit of Bald Mountain has an old fire tower that you can climb. On a beautiful day, like the one we had, there are 360 degree views of the surrounding lakes and mountains. The views were breathtaking and certainly worth the effort! We were lucky enough to chat with a Northeast Kingdom family on top of the fire tower. Familiar with the landscape, they pointed out the Green Mountains, White Mountains in New Hampshire, the various lakes, and even the distant outline of some mountains in Maine. 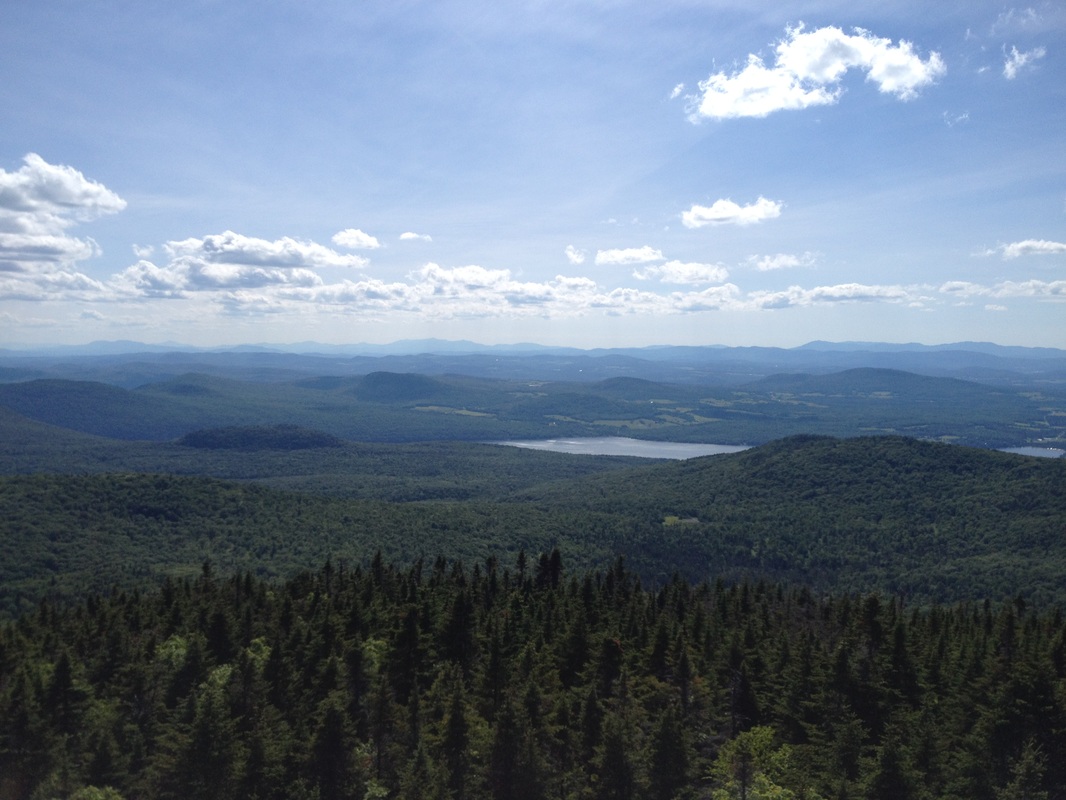 View from the top of Bald Mountain, Northeast Kingdom, Vermont 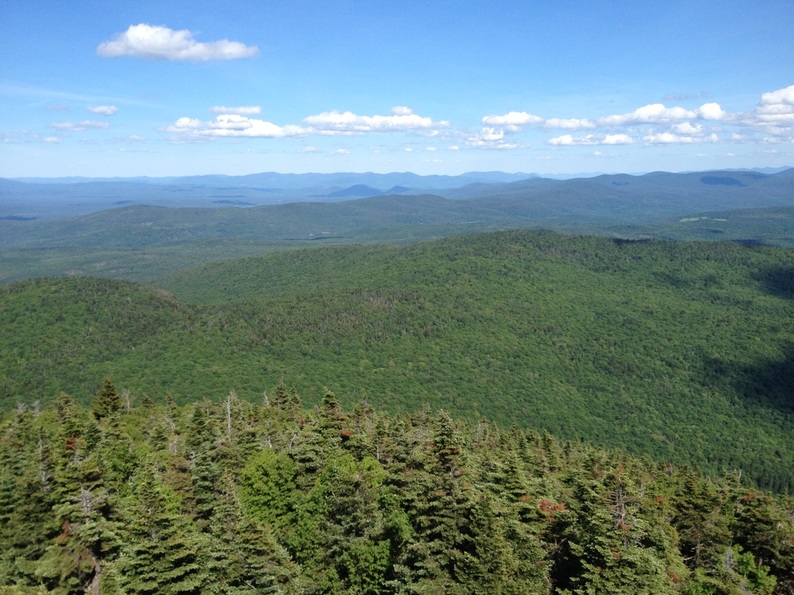 View from the top of Bald Mountain, Northeast Kingdom, Vermont After descending, we returned to our campground. We camped at Will-O-Wood Campground, near Lake Willoughby. It was fine, though definitely not a campground for those who want solitude. It is a family campground, with a pool and many children running around. It seemed as though a lot of families from Vermont, NewHampshire, and Maine camp for the entire summer in their RVs. We picked it for its proximity to Lake Willoughby and last-minute availability. Brett and I were lucky to get a site on the edge of the campground, meaning we didn't have to worry about pool noise or too many people running by our campsite. Had the weather been sunny on Sunday, we could have walked or driven down the road to the beach at Lake Willoughby. On our way to Bald Mountain, we drove by Lake Willoughby, a beautiful lake surrounded by pine trees and rolling mountains. I packed a swimsuit, just in case, but it rained all night on Saturday and all morning on Sunday, so we headed back to Burlington without a stop at the beach. 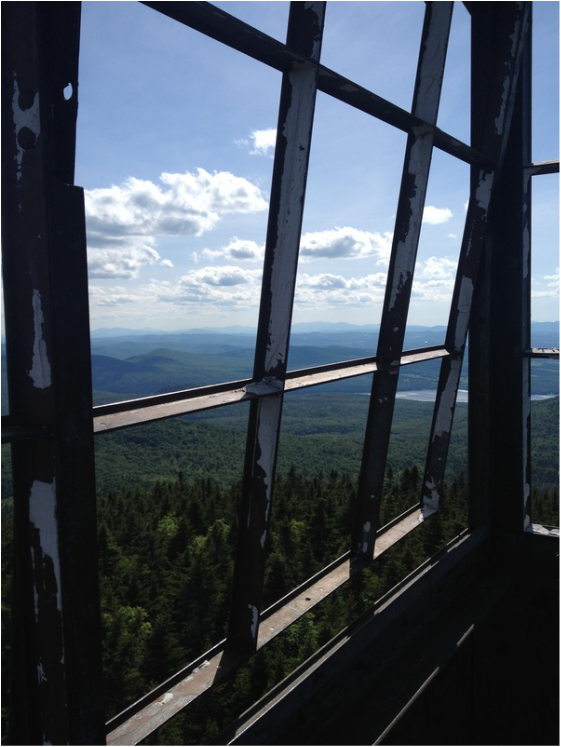 Window of the fire tower on top of Bald Mountain, Northeast Kingdom, Vermont 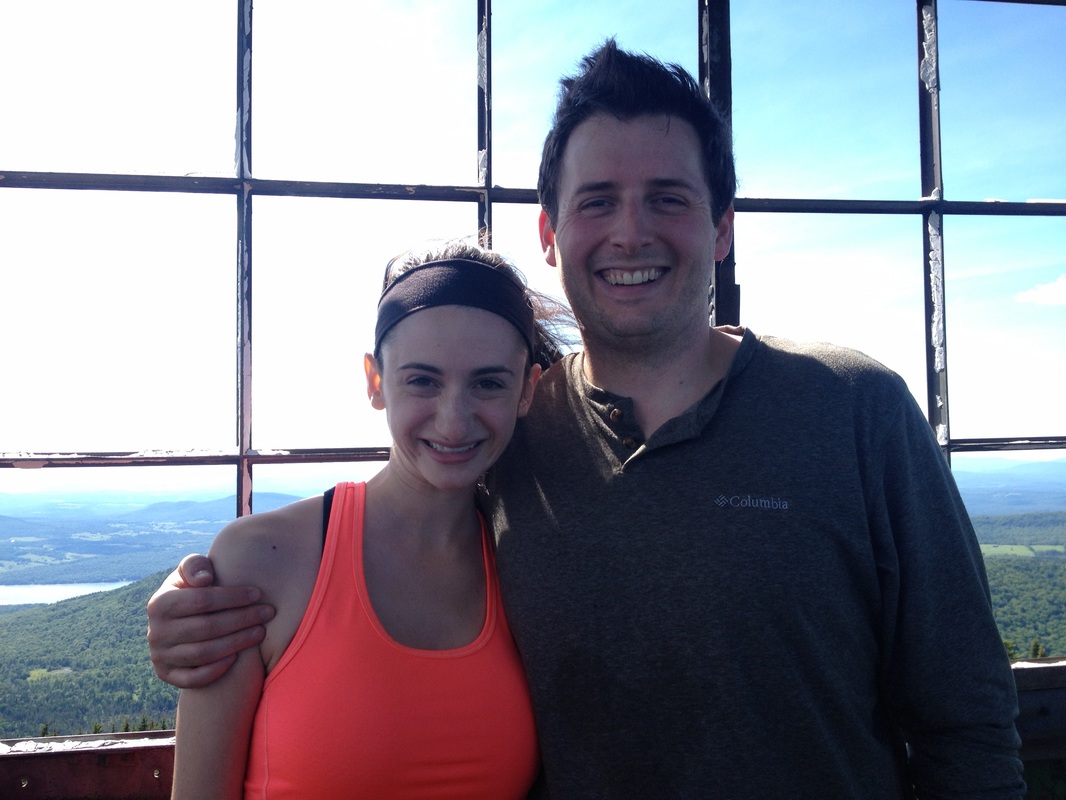 Brett and I on Bald Mountain, Northeast Kingdom, Vermont A final story from the Northeast Kingdom
Brett: "What do all these people do out here in the middle of nowhere? Like for jobs?" Me: "I don't know. Farm? Own these little stores? Make maple syrup?" Later that day, we were in a small shop by Lake Willoughby, waiting to buy bottles of water, when we overheard a conversation between the clerk and a girl about our age. Clerk: "What's up?" Girl:"Just working all the time." Clerk: "Yeah, what have you been doing?" Girl: "I canned maple syrup all day." Vermont is known as the Green Mountain State, and it truly lives up to that nickname. Around Burlington and beyond, there are mountains covered in dense blankets of dark green trees, in progressively lighter layers as they stretch into the distance. Naturally, with a landscape like that, there are hiking opportunities everywhere! Being new around here, I simply looked at my All Trails app and chose a hike within an easy drive of Burlington. As a side-note, All Trails is a great app for finding hikes, reading reviews, and getting directions to trailheads. The hike that I ultimately chose for my second day in Vermont led me to the summit of Camel's Hump in Camel's Hump State Park. 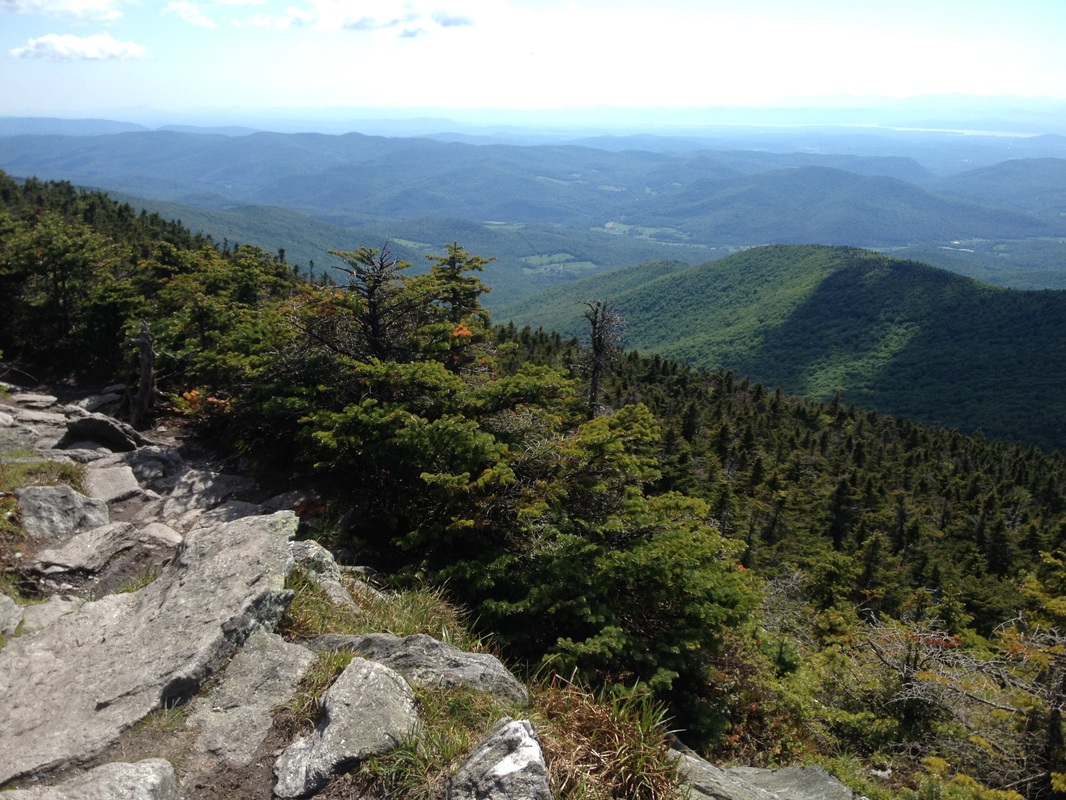 View from the summit of Camel's Hump, Vermont Camel's Hump, in the Green Mountain range, is the third highest mountain in the state at 4,083ft, meaning that there are incredible panoramic views from the summit. I ended up following directions from the app, which led me to the trailhead for the Monroe Trail up to the top. If you look at Camel's Hump on Wikipedia, it describes the Monroe Trail as an "easy to moderate" route. While the first half of the Monroe Trail is not too difficult - though it is uphill - I would say the second half is difficult. There are some portions of the trail that are covered by rocks that you have to hike up, and the last quarter-mile to the summit is very steep. I would not call myself a super-hiker, but I am reasonably fit and I found it somewhat challenging. The Monroe Trail is about 3.4 miles one-way. The whole route took me approximately 3 hours round-trip. The Burrows Trail is similarly rated in terms of difficulty but is a mile shorter (about 2.4 miles) and departs from a different trailhead. 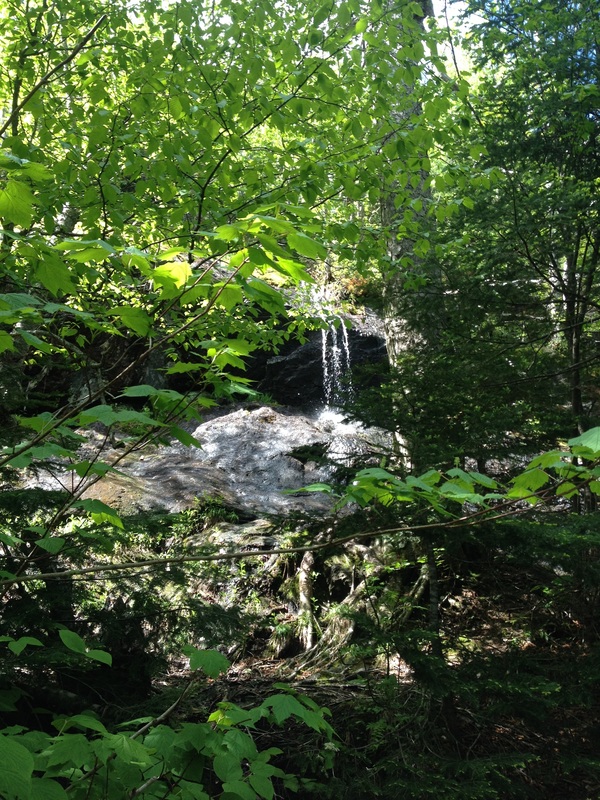 Monroe Trail, Camel's Hump State Park, Vermont Due to the dense tree cover on Camel's Hump, I only got small glimpses of the view until the very top of the mountain. However, I found hiking through the trees pleasant, giving me a chance to enjoy the aroma of the forest and the sunlight filtering through tree branches. About half-way up the mountain, I began hearing trickles of water and soon passed small streams and waterfalls that flowed alongside and across the trail. The whole hike was an interesting experience for me because it was my first ever solo hike. I have always hiked with friends, on short day hikes as well as multi-day backpacking trips. Hiking alone gave me heightened awareness to the nature sounds around me, and it gave my mind plenty of time to wander. Even without companionship, I enjoyed the physical challenge of walking and the emotional challenge of feeling small compared with the natural world. 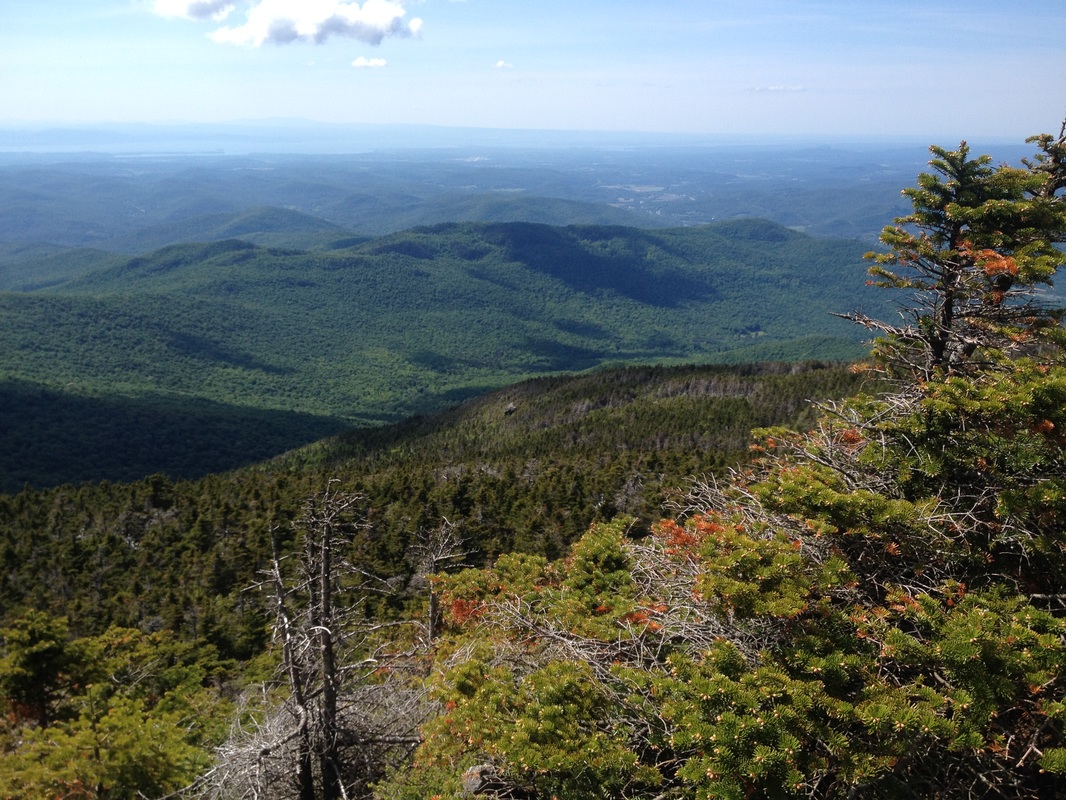 View from the summit of Camel's Hump, Vermont Though I did not have a view much of the way up Camel's Hump, the sweeping panoramas at the top made all of the challenges worthwhile. I was able to see across the mountains in the Green Mountain range to Lake Champlain and beyond to New York. I was incredibly grateful to have a clear, sunny day. I found a rock to sit on and admire the view while resting my feet. At the summit, a red shirt caught my eye because I noticed that it had a University of Wisconsin-Madison logo. I stopped the guy and said, "Hey! Did you go to Wisconsin?" It turns out that he had attended UW and graduated in the same year as I did. He and his girlfriend had moved to Burlington a year earlier. This chance meeting reminded me how small the world can be. Who would have thought that I would bump into a fellow UW graduate on top of a mountain in Vermont? Encounters like these make me feel connected to other people and grateful for unexpected interactions. I also chatted with a girl who was hiking the Long Trail with her mom. Hiking the Long Trail is one of my goals for the summer, so hearing her perspective and experience was exciting. I descended the mountain feeling happy and encouraged by these short conversations, as well as refreshed by my time outdoors. For my first hike in Vermont, Camel's Hump was a great choice, offering me a physical challenge and a beautiful view of the landscape. 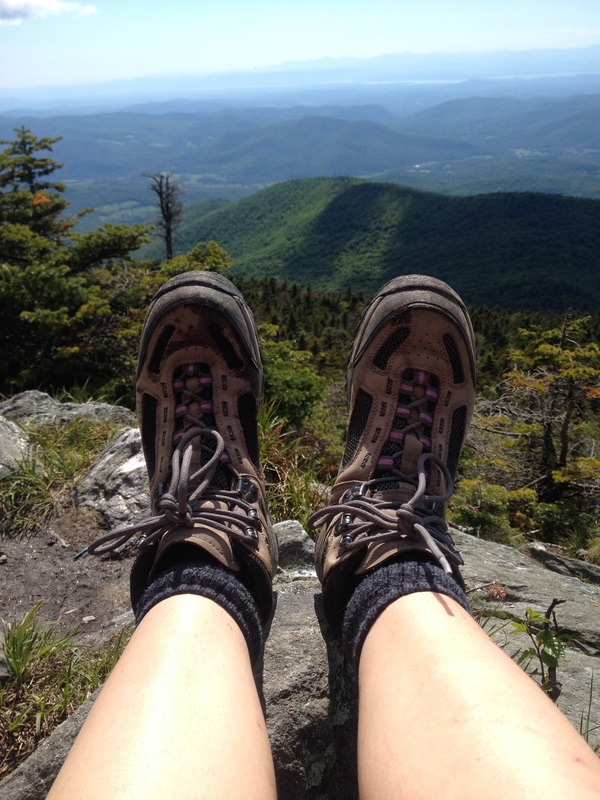 Resting my feet on top of Camel's Hump, Vermont “It had nothing to do with gear or footwear or the backpacking fads or philosophies of any particular era or even with getting from point A to point B. It had to do with how it felt to be in the wild. With what it was like to walk for miles with no reason other than to witness the accumulation of trees and meadows, mountains and deserts, streams and rocks, rivers and grasses, sunrises and sunsets. The experience was powerful and fundamental. It seemed to me that it had always felt like this to be a human in the wild, and as long as the wild existed it would always feel this way.”
- Cheryl Strayed, Wild: From Lost to Found on the Pacific Crest Trail 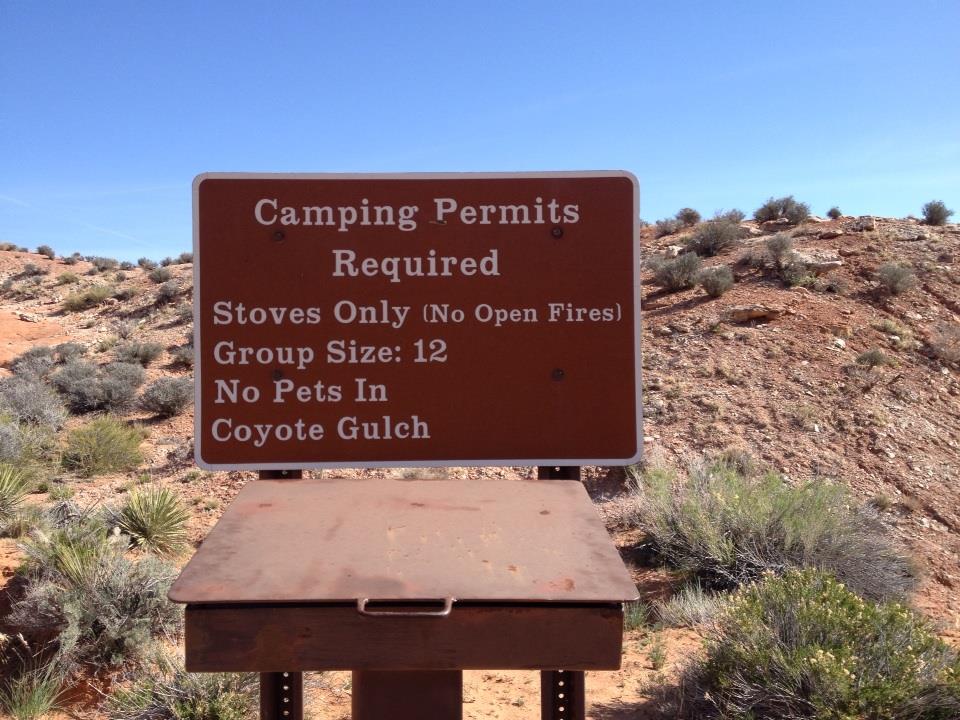 You know those times you just need a break? Last March, I was struggling through the spring semester at my job, filling out stacks of paperwork and watching my caseload of students continue to expand. I really needed an adventure to get me through the end of the school year, and then my friend, Ciara, invited me on a backpacking trip in Utah. I just so happened to have a couple of personal days left at work, so I immediately found some cheap airfare to Las Vegas and started looking forward to exploring southern Utah.  By complete happenstance, Ciara and I ended up on the same airline connection between Los Angeles and Las Vegas, even though she flew from Nashville and my flight originated in Austin. My reading material for the plane was Eiger Dreams by Jon Krakauer, which I highly recommend for all readers but especially for those who are embarking on an adventure. It is a collection of short stories that he has written about all types of outdoor adventures and adventurers. As we waited in the Las Vegas airport to meet up with Ciara's dad - the three of us were hiking together - we joked that we were probably the only people on our airplane to fly into Vegas with the intention to leave it as quickly as possible. Whereas people sitting near us were dressed in high heels and layers of makeup, we sported hiking boots and huge backpacks. However, I have to admit that one of the perks of a backpacking trip in that region of the country is that there are always good airfare deals to Las Vegas.
In Las Vegas, we rented a car and drove to Escalante, Utah, making a few pit stops along the way, such as in St. George, UT for camp stove fuel. From St. George, the winding roads took us through Zion National Park, and, I must admit, I was awestruck. Zion National Park is absolutely breathtaking. I hope to return for more hiking and camping in the park, since we were only able to drive through it. That night, we arrived in Escalante, a tiny town in southern Utah and our gateway to the Canyons of the Escalante. The following morning, we packed up our backpacks and headed to the Circle D Eatery for some breakfast before heading out on the trail. The Circle D Eatery turned out to be a hearty and delicious meal that was perfect sustenance before our hike.
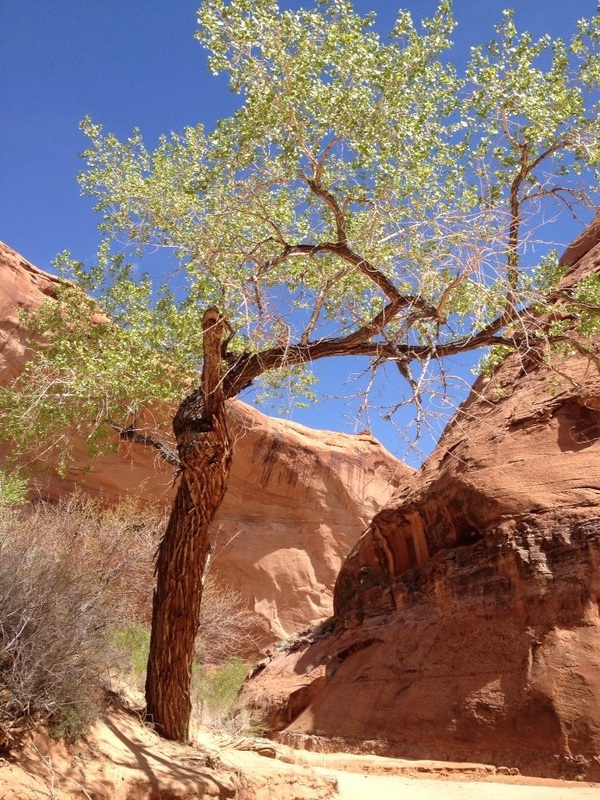
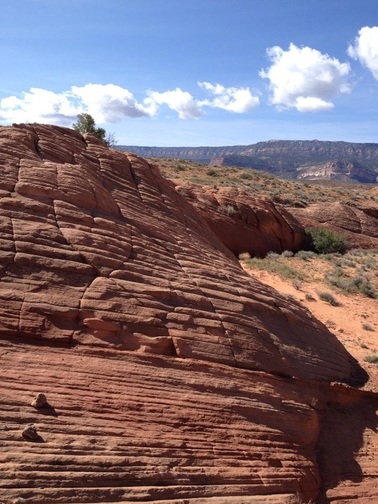
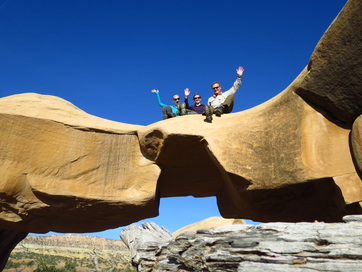
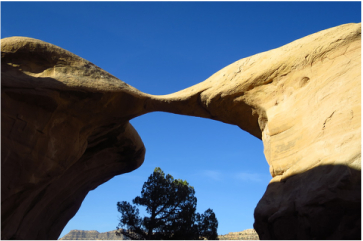
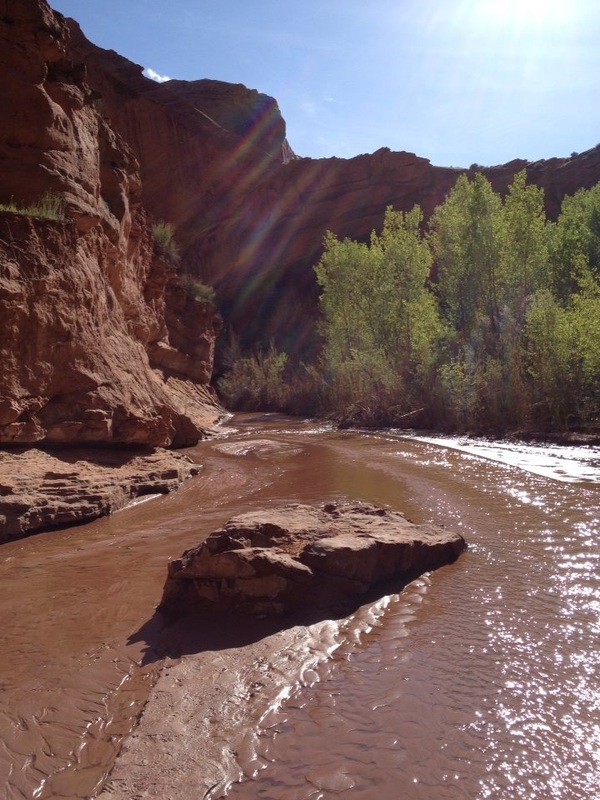
Our first stop on the way to the trailhead was Devil's Garden, part of Grand Staircase-Escalante National Monument that features striking rock formations and arches. We spent some time walking through the formations in the early morning sunshine before heading to Coyote Gulch. Our hike into Coyote Gulch began at the Hurricane Wash trailhead. Coyote Gulch "exhibits many of the geologic features found in the Canyons of the Escalante, including high vertical canyon walls, narrow slot canyons, domes, arches, and natural bridges" (source: Wikipedia). Having never been in a canyon or in southern Utah, I was amazed at the high walls, the color of the red rock, and the natural arches. Much of our hiking followed the river, so we almost always had water available. There are a number of awesome natural features on this hike, including Jacob Hamblin Arch, which we encountered on our hike. I particularly loved the contrast of the bright blue sky peeking through the red rock arches. 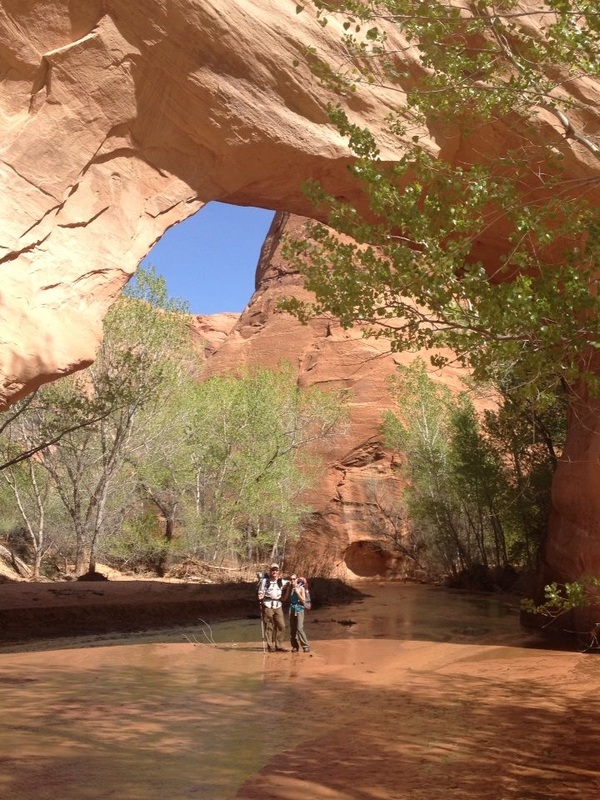 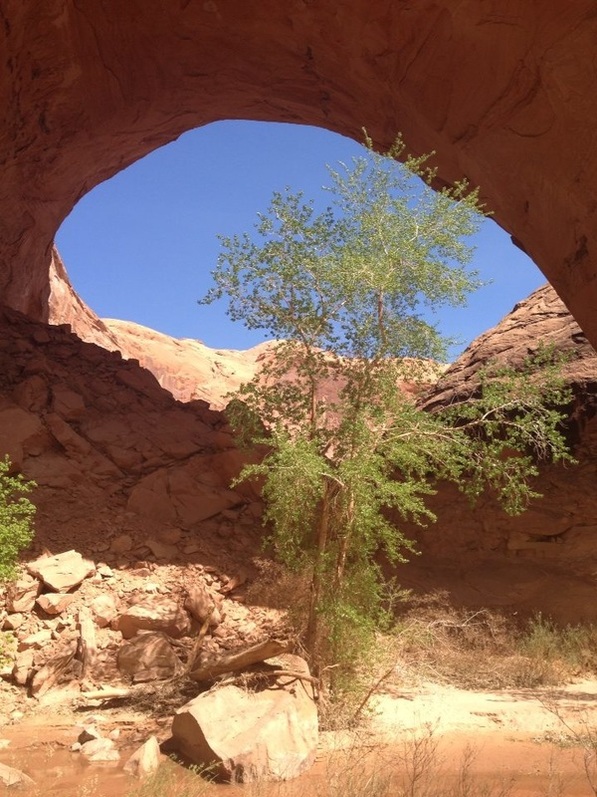 When we came to a spot near the river and decided to camp for the night, we set up our tents, then set about exploring the area. Ciara and I climbed down into the shallow river and freed our feet from the confines of our hiking boots. The day had turned into a glorious desert afternoon with a cloudless sky and sunshine. We waded in the water, feeling the cold water flow around our feet and looking up at the red canyon walls rising around us. In that moment, it was easy to forget about the stress of the school year and focus solely on the beauty of nature around me.
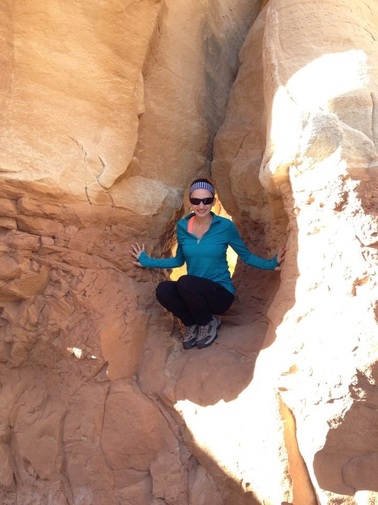
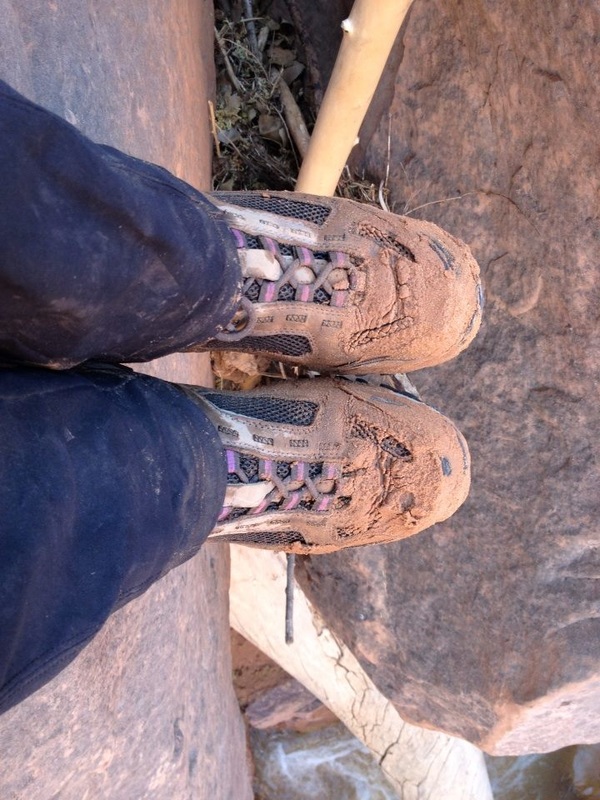
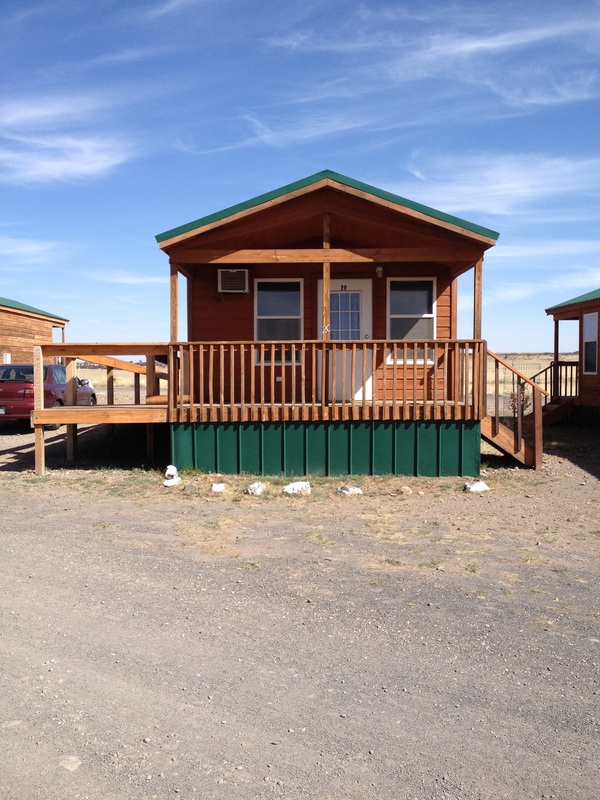
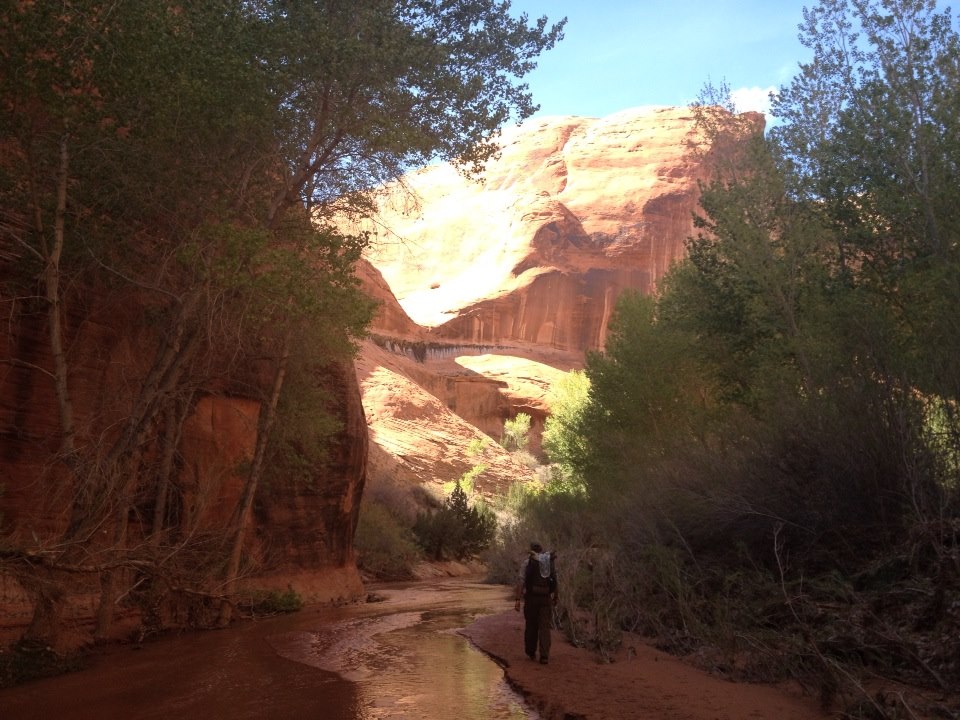 In the morning, we ate breakfast and broke down our camp. As expected in a desert, the temperature had dropped significantly overnight, so there was a morning chill in the air, though the sun was shining brightly. Making our way toward the climb out of the canyon, Ciara's dad recommended that we fill up our water bottles, as the hike would take us up away from the river. He was familiar with this route, having hiked it in the past. The final part of the hike was the most difficult, as we had a steep incline out of the canyon to conquer. After climbing up for awhile with the hot sun beating down on us - by this time, the desert had warmed up - our group was rewarded with sweeping views over the canyon. However, we were not out yet! To exit the canyon, we had to go through "the crack", a narrow opening in the canyon rim, barely wide enough for one person without a pack. Ciara's dad went first, squeezing through the crack without his pack, which Ciara and I then teamed up to hoist up to him. Then, we passed up each of our packs before taking our own turns squeezing through the narrow crack in the wall. 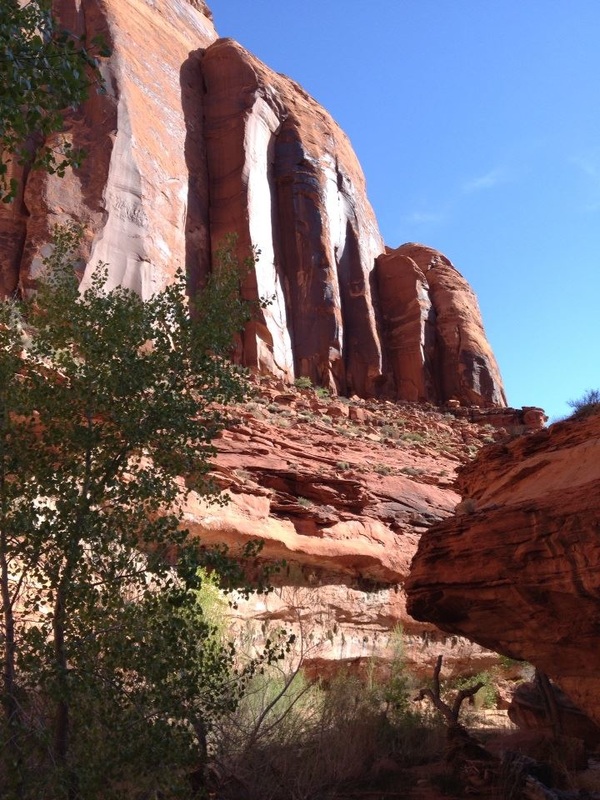 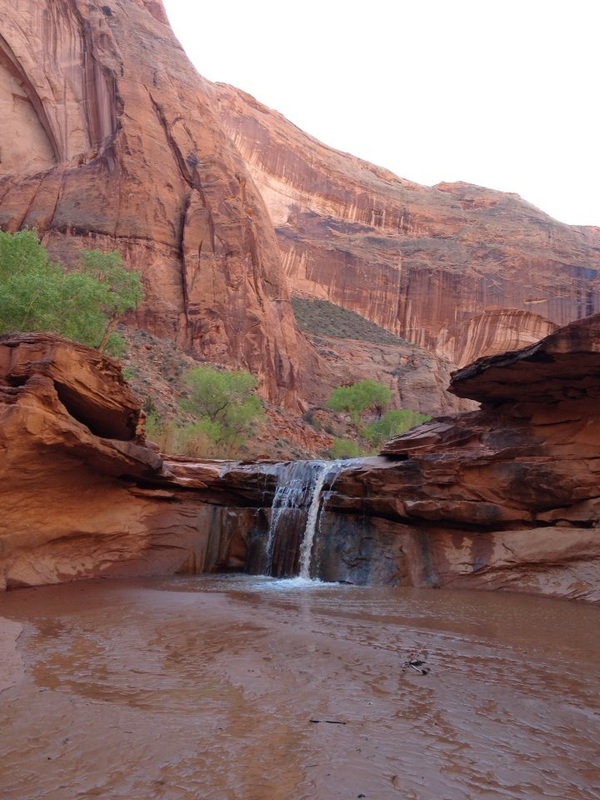 Once we squeezed through the crack in the rocks, our group rested at the canyon rim, tearing into our lunches and enjoying the view. Though I was filled with a sense of accomplishment to see what I had just completed, it was humbling to look out over the canyon that we had just hiked and realize how small we were compared to its size. We saw people swimming in the river, and other hikers embarking on their own trips. When lunch was finished, we set off again because we still had more walking to do, even though we had exited Coyote Gulch canyon. We had to walk across the desert to the trailhead near the end of Fortymile Ridge Road, where there was a parking lot. However, if you remember the beginning of our trek, we entered Coyote Gulch at Hurricane Wash trailhead. So, once we reached the parking lot, we were faced with two options: walk miles down the road to our car or hitch a ride with fellow hikers. Luckily for us, we encountered a couple who had been doing research on the water in the canyon. They were just packing up their car when we walked into the parking lot, and they offered to drive us to the Hurricane Wash trailhead, saving us hours of walking.  The Coyote Gulch route that we hiked was perfect for a long weekend getaway. It took two days total and was a great escape from everyday life. The route had its challenges, but it wasn't too difficult. The most challenging part of our route was the exit, while hiking in the actual canyon was fairly easy. Plus, it is possible to enter and exit Coyote Gulch at multiple different trailheads, so you can modify the route to fit your own needs. After the three of us were dropped off at Hurricane Wash and celebrated with cold beverages, we hit the road and continued to explore southern Utah, on Route 12 Scenic Byway and the Burr Trail, which took us through Capitol Reef National Park. As I looked out the window of the car, with canyons and rock formations rolling by, I couldn't help but feel completely refreshed and rejuvenated, from the physical challenge of hiking, from the beauty of nature, and from good conversation with good friends. It might be a cliche, but, at that moment in time, my adventure in southern Utah was exactly what I needed. 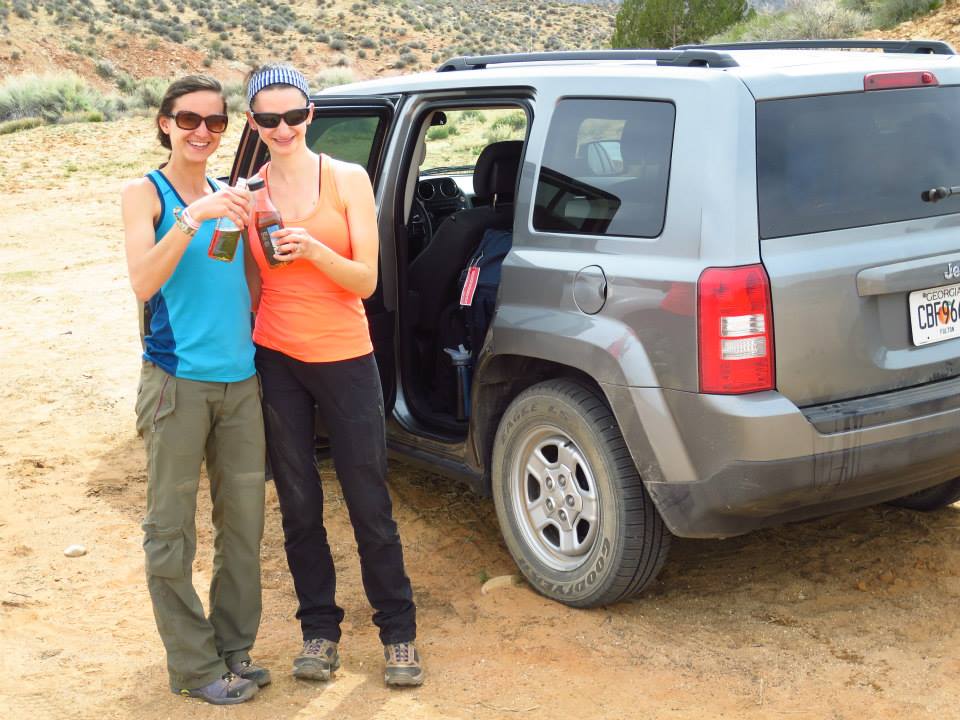 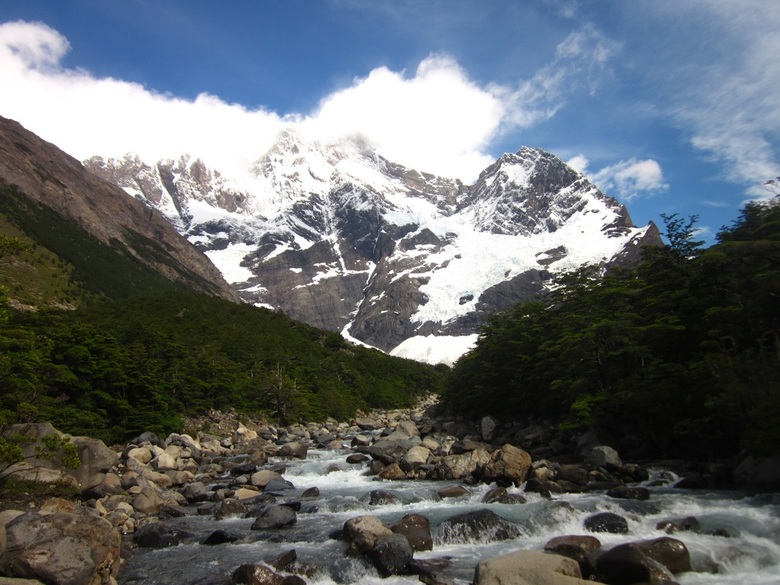 W-Circuit, Torres del Paine National Park In December 2012, four friends and I embarked on a trip to Chilean Patagonia, where we explored Torres del Paine National Park. This national park is awe-inspiringly beautiful. No, that photo above is not from somewhere on the internet. I took it on our hike. Pretty incredible, right? Here are some quotes from my travel journal: "Torres del Paine National Park is unbelievable and beautiful and almost unreal. It is unlike anything I have ever seen." "I was in awe of the scenery. Even the part of the forest where the trees had been burned by fire had a stark, desolate kind of beauty with some new life springing up in the form of grass and flowers. And, no matter which way we turned our heads, there was beautiful scenery - to our right, the mountain peaks, and, to our left, the lake, glacier, and more mountains in the distance." "Everything out here is so other-worldly beautiful that it's easy to see God's hand. Patagonia is beautiful and I am content." This was my first multi-day backpacking trip, and I believe that the "W" circuit in Torres del Paine National Park is the perfect place for someone with any level of experience. First of all, you will be hard-pressed to find a more beautiful place with such diverse scenery. Have I made this point enough? It's beautiful. Another awesome thing about the park is that you can drink any water in the park because it's all fresh glacier run-off, meaning that the water is fresh, cold, clean-tasting, and readily available. You don't have to worry about hanging your food when camping because there are not bears or other scavenging animals in the area. Finally, if camping is not your thing, you can always hike between the refugios with a lighter pack, sleep in a bed every night, and eat meals in the refugio restaurants. We went the cheaper route by carrying our own camping equipment and food, but I really enjoyed camping in the park each night and the sense of camaraderie among the backpackers at campsites. 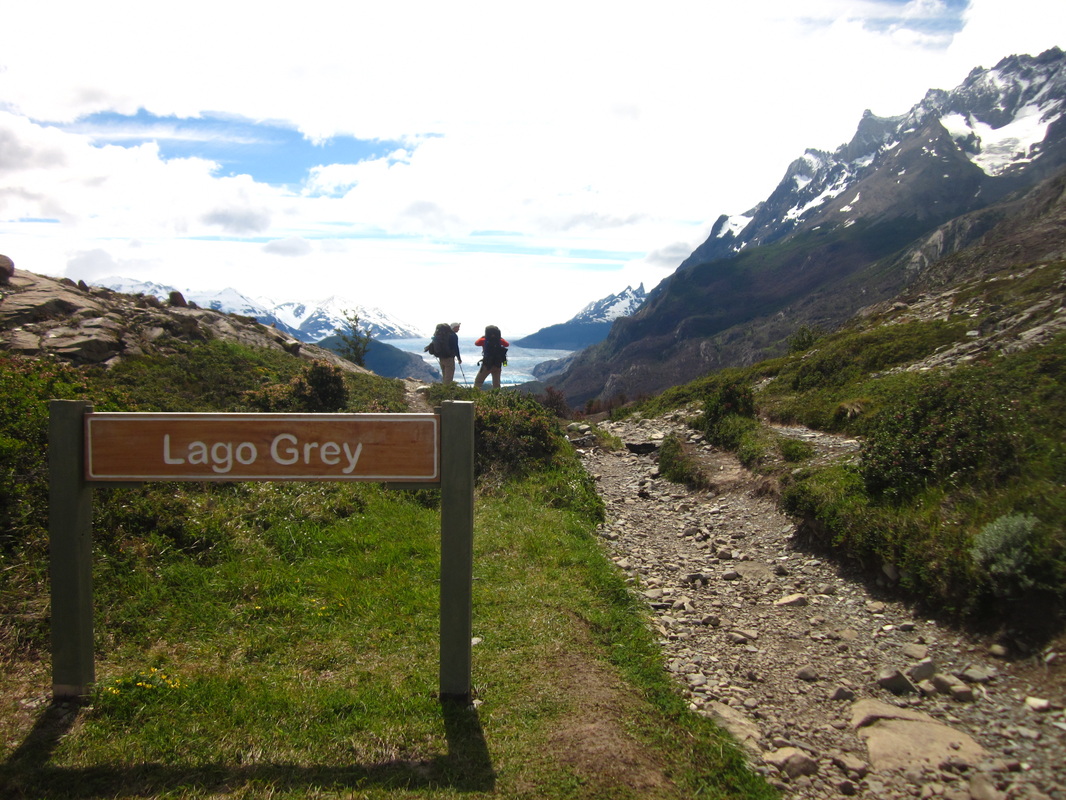 Mirador by Lago Gray, W-Circuit, Torres del Paine National Park 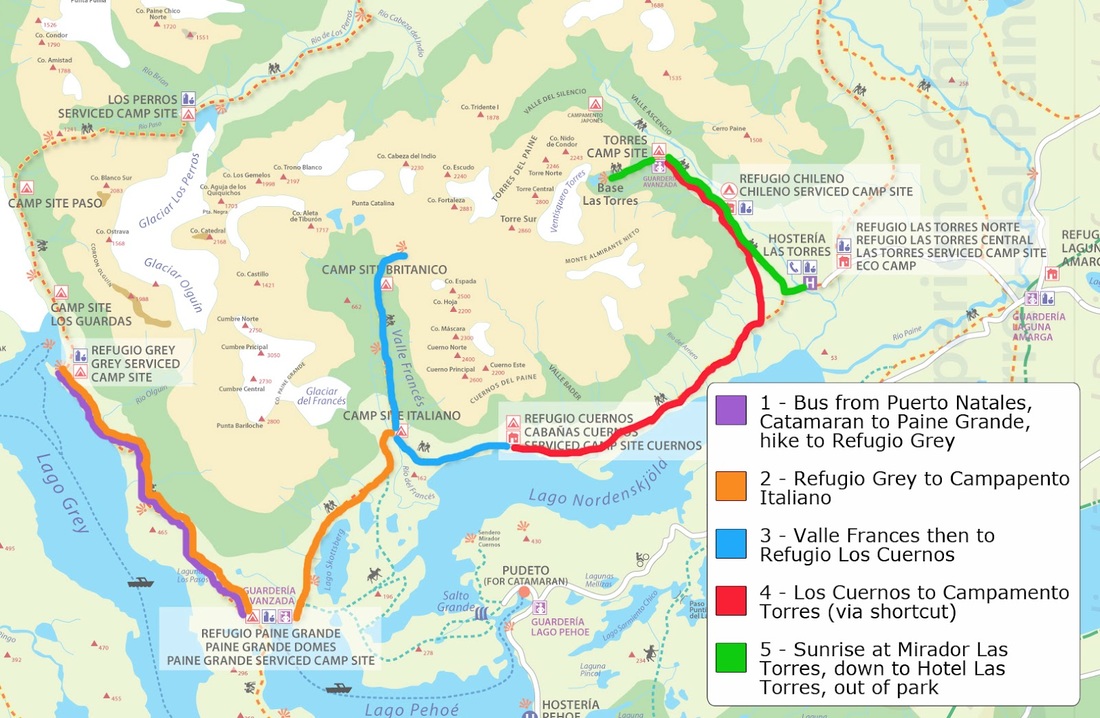 Map Credit: http://www.stephandben.com/2012/04/map-how-to-hike-w-in-torres-del-paine.html The "W" RouteDay 1 Hiking Distance: 11 km From the bus drop-off, we had to take a ferry across Lago Pehoe before we could start hiking. I was taking pictures like crazy from the ferry, but I had no idea that even more spectacular scenery awaited me on our 5-day hike. The ferry dropped us off by Refugio Paine Grande, and we set off on our hike. Our destination was the Refugio Gray campsite. We were treated to stunning views of Lago Gray and Glacier Gray as we hiked. I was in awe the entire time, particularly at the intense blue color of the water contrasted with the dark mountains rising behind it. Unfortunately, the picture below doesn't portray the vibrant color of the water. We camped near Refugio Gray. From the refugio and campsite, there is a short trail that leads to a glacier overlook. Our group decided to take the short walk and was rewarded with views over Glacier Gray. At the campsite, there was a shelter with tables that campers could use to cook. Even though we were blessed with beautiful weather, I could see the shelter being useful in high winds and during rainstorms. On the night we camped, the bugs swarmed around our tents, so we turned in early, partially to escape the bugs and partially because we were exhausted from the day's hike. 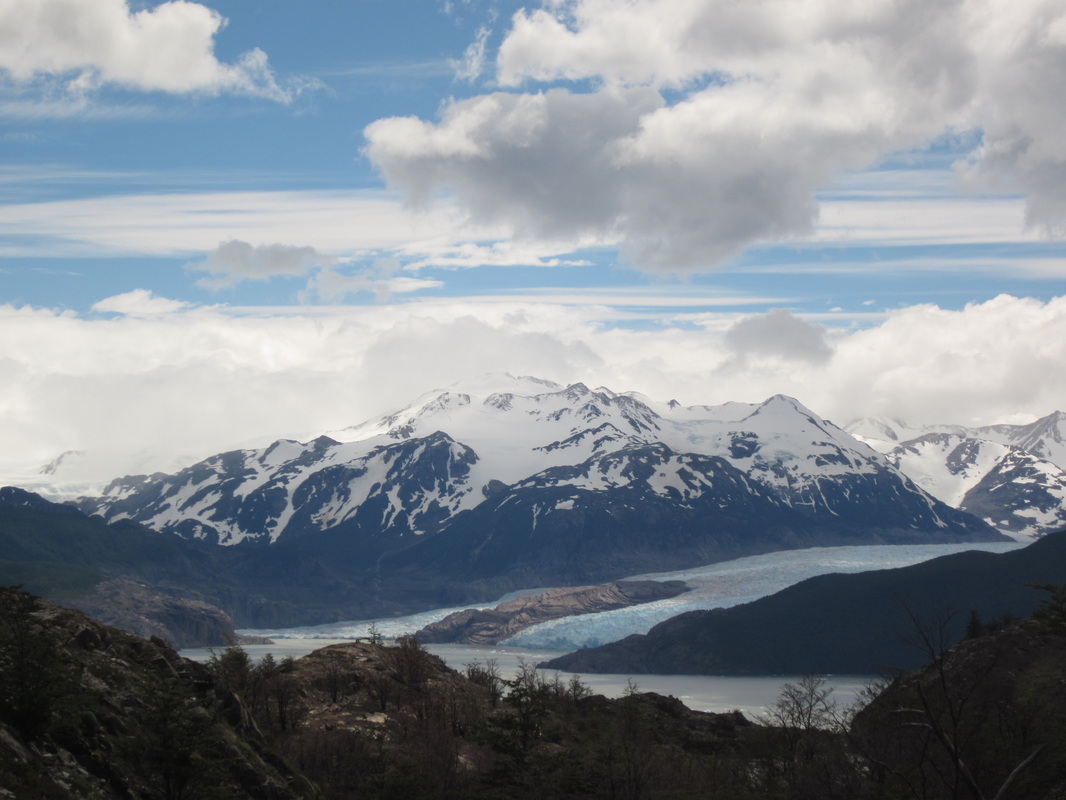 Lago Gray and Glacier Gray, W-Circuit, Torres del Paine National Park 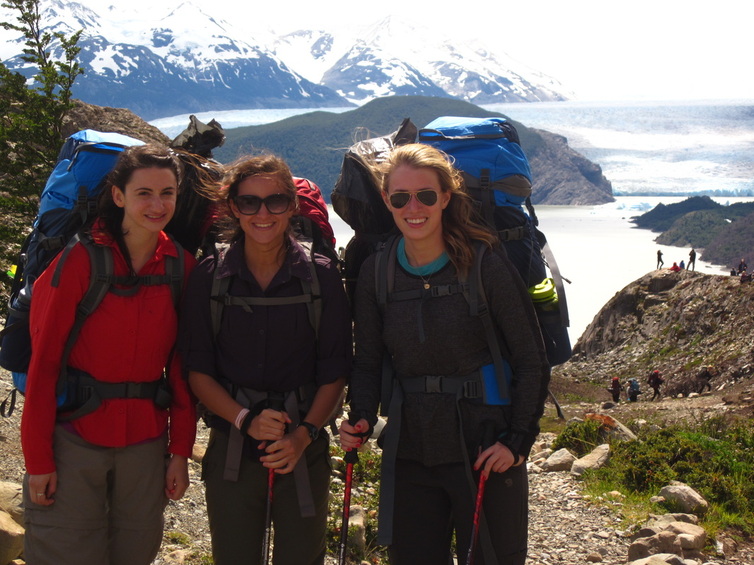 The girls with Glacier Gray in the background, W-Circuit, Torres del Paine National Park Day 2 Hiking Distance: 18.6 km The second day's section of the "W" required us to retrace our steps back to Refugio Paine Grande and on to Camp Italiano. It might seem annoying to retrace the steps that you hiked yesterday, but, trust me, looking at those views never gets old. Plus, part of the hike is through new terrain. This isn't a problem if you do the longer "O" Circuit, where the loop is completed, so there is no retracing of your steps. The views of Paine Grande and other mountains made for excellent hiking scenery, but the best part of the day actually came at the end. When our feet were throbbing and our shoulders were aching and all we wanted was to arrive at the campsite, we came to a wooden bridge over a river. Only two people were allowed to cross the bridge at a time, so the rest of us were unaware of the treat that awaited us until we reached the middle of the bridge. I kept thinking, "Why is everyone stopping to take pictures in the middle of this bridge?" Then, I reached the middle and was rewarded with a spectacular mountain view - the one in the picture at the top of this post - and that gave all of us renewed energy at the end of a long day, 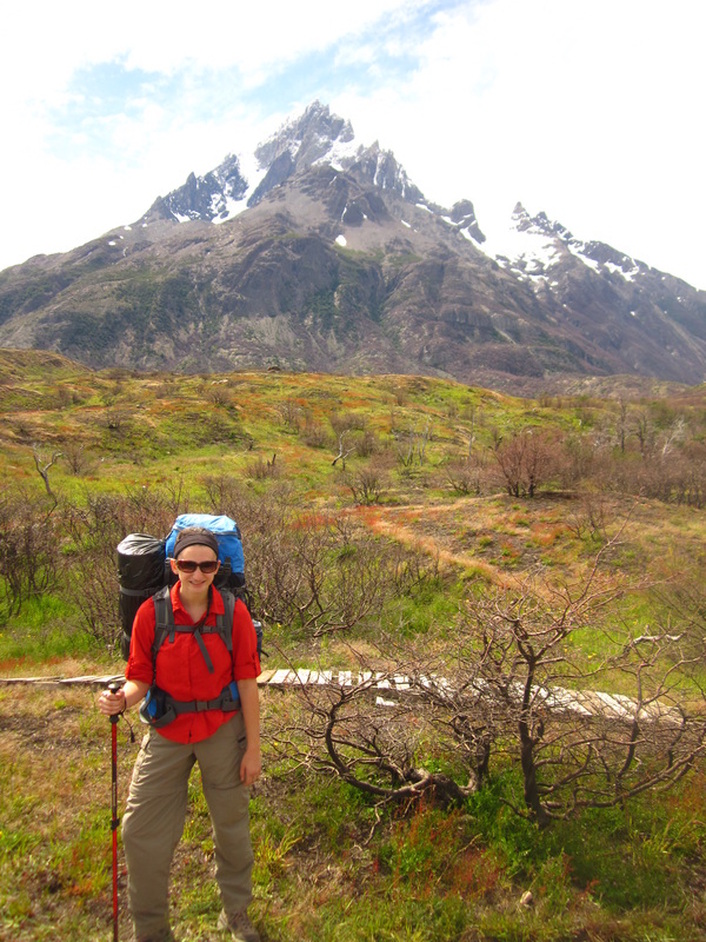 Me by Paine Grande, W-Circuit, Torres del Paine National Park 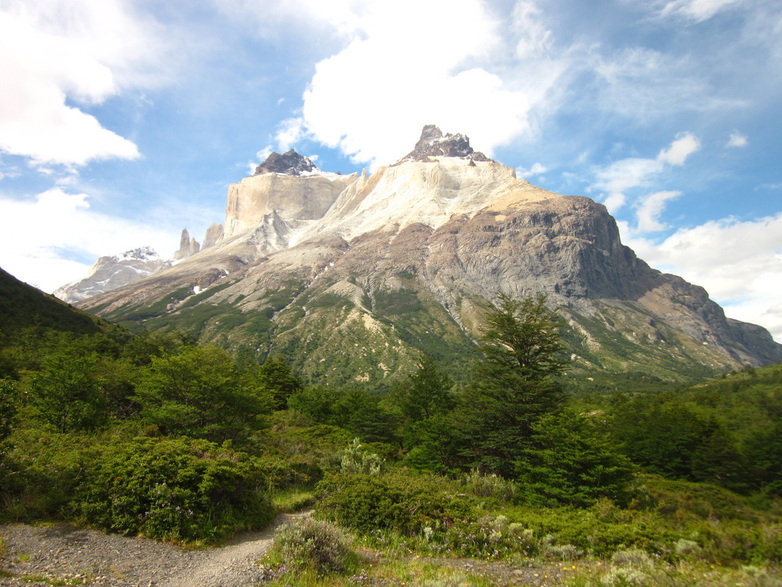 Cuernos del Paine, W-Circuit, Torres del Paine National Park 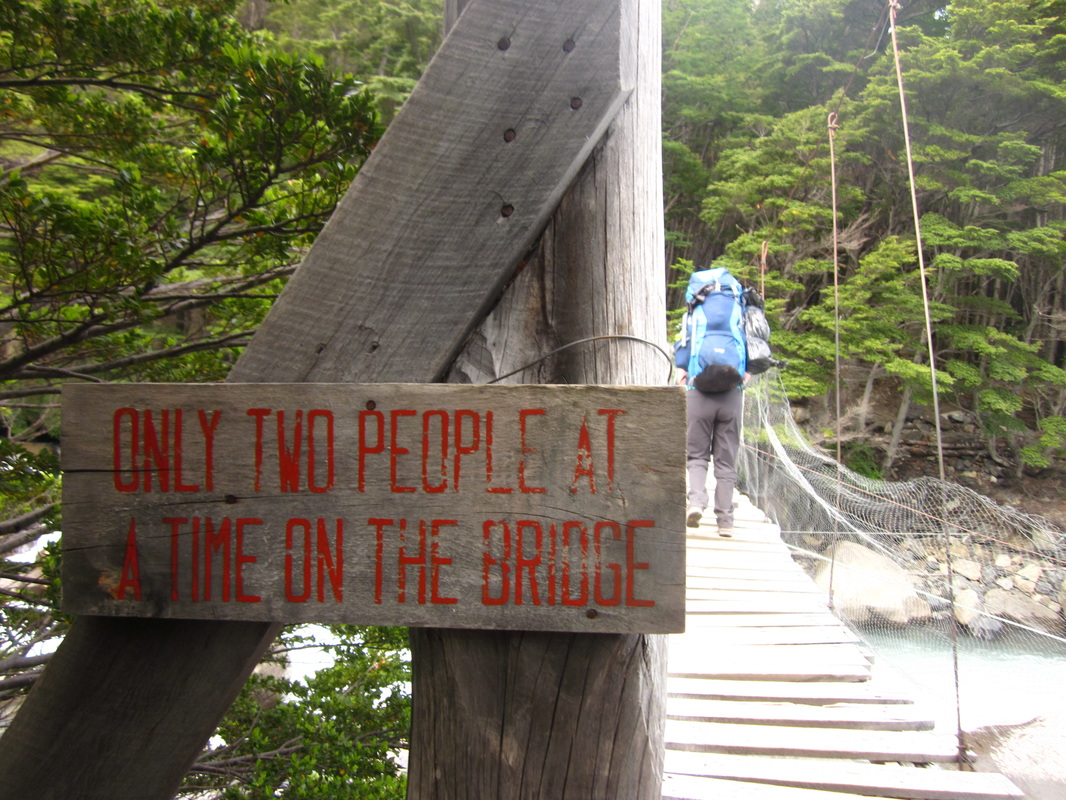 Bridge with spectacular views, W-Circuit, Torres del Paine National Park Day 3 Hiking Distance: 20.5 km We started the day by taking our instant coffee from the campsite down to the river with the beautiful mountain view that you see at the top of this post. Let me tell you, instant coffee has never tasted so good as it did with fresh air, beautiful views, and the sound of rushing water nearby. Today's hike was up into the Valle Frances, the middle portion of the "W", meaning we would hike into the valley and then retrace our steps to continue on the next branch of the route. Which meant that we could leave our packs at the campsite and pick them up when we came back through! After carrying our big backpacks, carrying just water and a snack was heavenly! The Valle Frances was incredible. The hike in ended on top of a big rock in the middle of the valley, with snow capped mountains rising up around us in a 360 degree panorama. After taking it in and heading back to our campsite, we grabbed our packs and continued on to camp at Los Cuernos. On the way, we walked on the shore of a lake, taking a quick break in the sunshine on the beach. I loved the campsite at Los Cuernos because our tents were on platforms with views of the lake and mountains. I took my boots off of my aching feet and ate dinner with my legs hanging over the edge of the platform, soaking up the view. 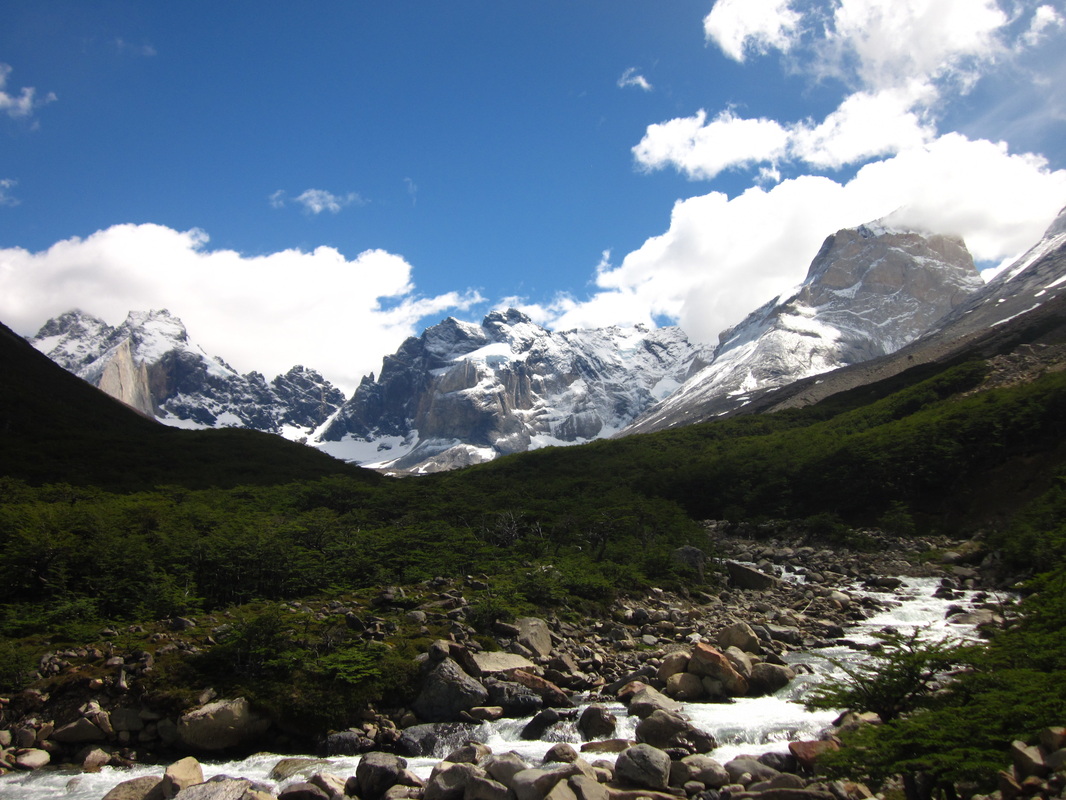 Valle Frances, W-Circuit, Torres del Paine National Park 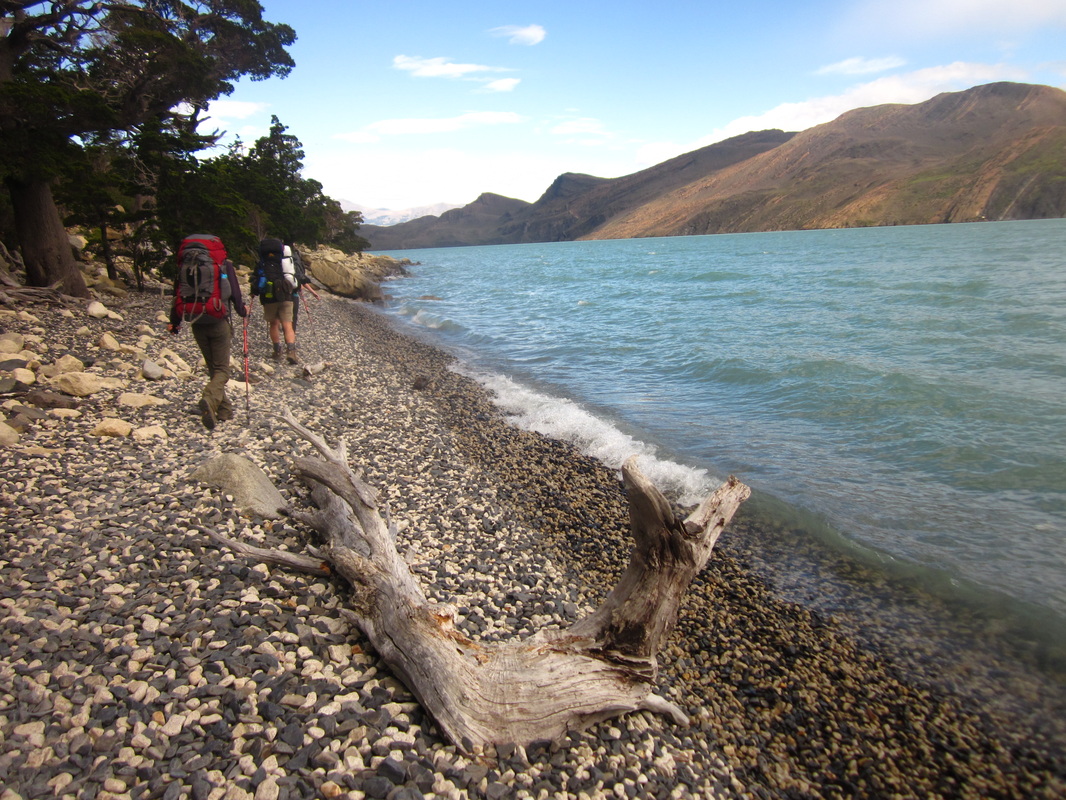 Hiking by Lago Nordenskjöld, W-Circuit, Torres del Paine National Park Day 4 Hiking distance: 20 km Today's hiking took us through rolling hills covered in green foliage, past bright blue lakes, and by wild horses grazing in the meadows. We commented that it reminded us of Scotland, despite nobody having been to Scotland at that point. But, hey, pictures. Much of the hike was uphill so it was hard on my feet and knees. Toward the end of our hiking for the day, we crossed the river pictured below, and began a climb upward to Campamento Torres. Luckily, we were able to stop at Refugio Chileno before the last part of the trail to grab a quick snack and rest for a few minutes. Our plan was to camp at Campamento Torres, wake up before sunrise, and complete the hour-long climb to the Torres lookout just in time to see the sunrise over the Torres with some breakfast. 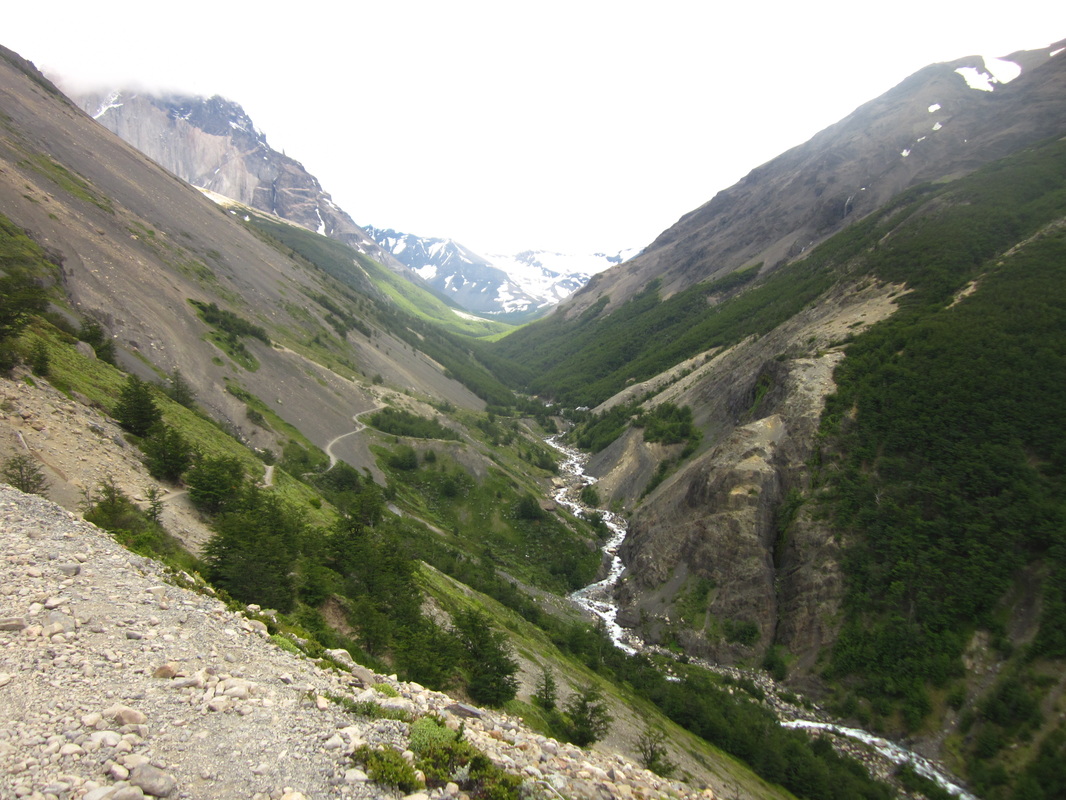 Views on Day 4, W-Circuit, Torres del Paine National Park 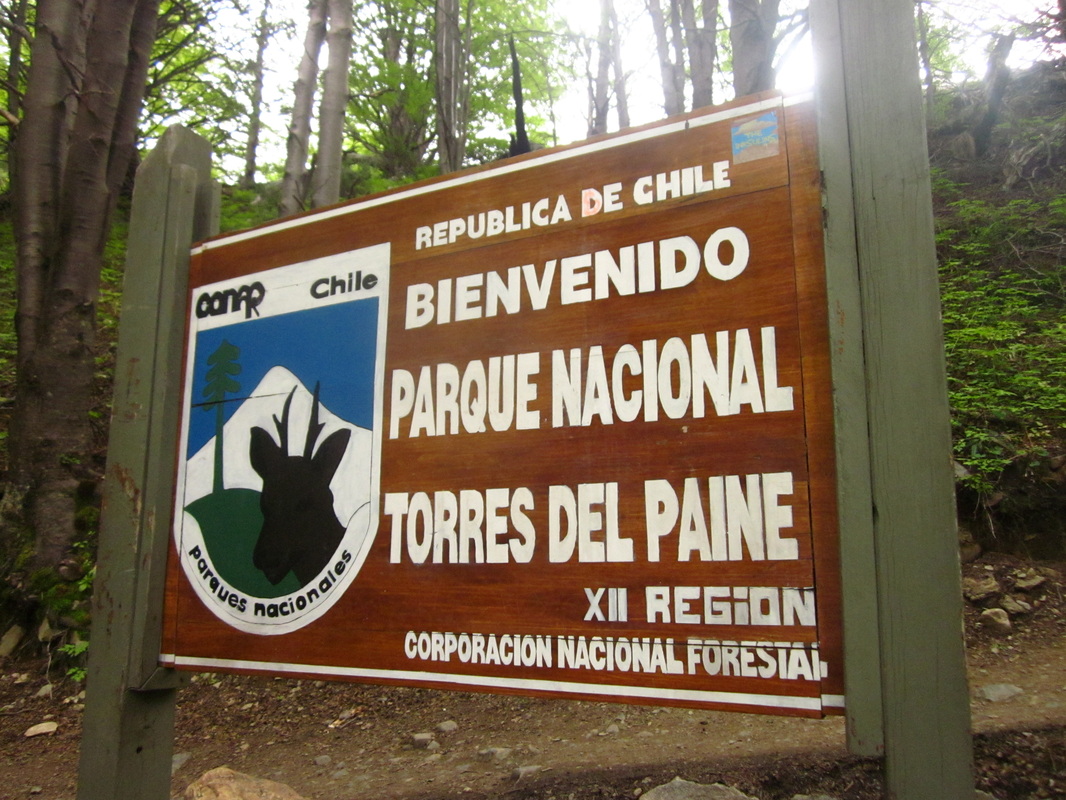 Welcome sign as we were leaving, W-Circuit, Torres del Paine National Park Day 5 Hiking distance: 10 km (approximately) As you may notice, I have no pictures of the actual Torres, the most famous landmark in Torres del Paine National Park. The reason for the lack of photo evidence is that, despite us waking up at 3:45am and climbing up to Mirador Torres, we were completely engulfed in a blizzard. Snow was falling heavily, our gloves and hats got soaked from the snow, and visibility was extremely low. We couldn't even see the outline of the Torres after the sun rose. Eventually, we had to accept the fact that we were cold, wet, and going to leave without seeing the Torres. It is important to note that the climb to the Mirador Torres is very steep and quite challenging. Headlamps are crucial if you are trying to climb before sunrise, particularly in the areas where you have to scramble over rocks and boulders. I hear the view at the top is worth it. I hope to experience it another time in my life! By the time we descended to camp, our group was freezing, soaked, and ready to be done. We threw our gear into our bags (to be sorted and dried later at our hostel) and practically ran down the trail to Hosteria Las Torres, where we changed into warm, dry clothes, scarfed down an amazing breakfast buffet, and waited for the bus to Puerto Natales in the cozy lobby. I would say that I was a little disappointed that we didn't get to see the Torres, but I wasn't crushed. I felt that so many scenic and impressive views occurred in the first 3 days of our trek - Glacier Gray, Paine Grande, Los Cuernos, Valle Frances - and I was incredibly grateful that we had perfect weather for those days. We missed one landmark but got to enjoy so many others throughout the W Circuit that I can't say the blizzard ruined our trek. Some people propose going the reverse direction, starting with the Torres and ending with Glacier Gray and the catamaran. I was happy with the route we took, and I think that either direction will give you opportunities for beautiful memories. Remember, there's no guarantee for nice weather on any given day! Plus, we actually got to see the Torres from the estancia we stayed at following our hike. They weren't as close as they would have been from Mirador Torres, but they were still majestic in the distance. 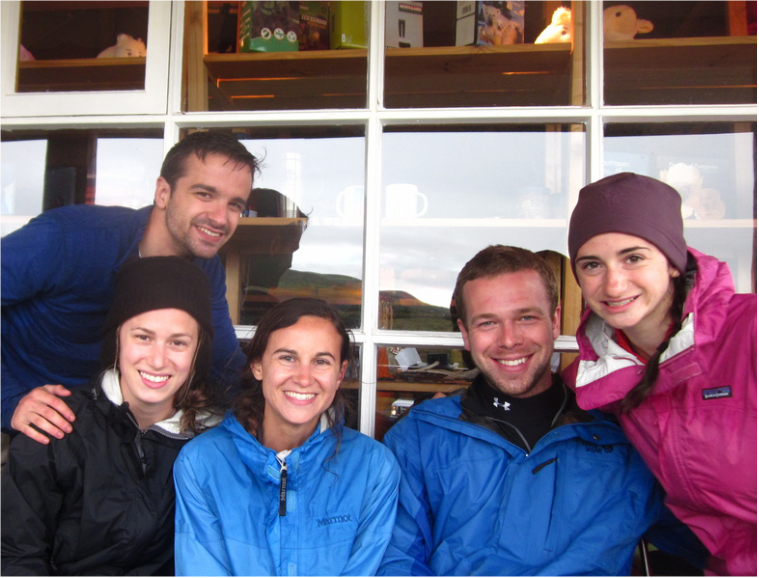 Our post-hike "best photo ever" TipsI highly recommend going to the free Erratic Rock information session in Puerto Natales before you head to the park. It happens every afternoon, and the sessions are given by people who have hiked and guided in the park. Like I mentioned above, some people choose to hike west to east and others choose east to west. You don't have to follow their recommendations, but the Erratic Rock information session is full of great tips on logistics and gear. It's always nice to hear from people who have done the route before. Besides, it's free! What's better than that? 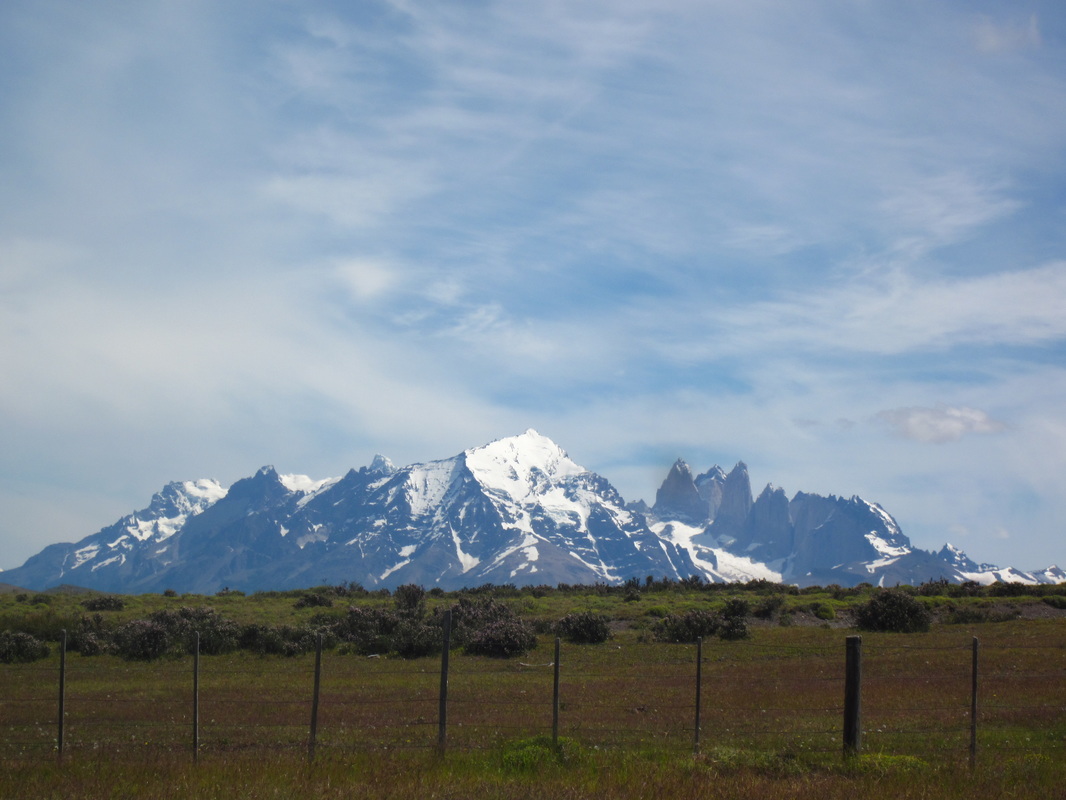 Torres from a distance, Estancia Cerro Guido 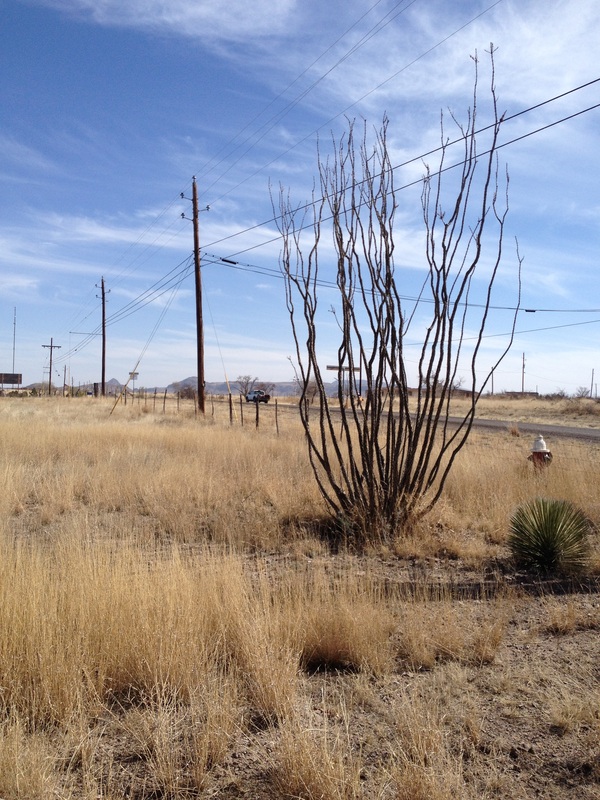 Outside Fort Davis, TX Last year for spring break, my husband, Brett, and I wanted to plan a spring break trip on a budget. We tried to figure out where we could drive to stay on our budget, but the problem in Texas is that you can drive for a whole day and still be in the same state. There are places I want to go in Texas, like Padre Island National Seashore, but no way were we heading to the beaches on spring break. So, after considering our options within driving distance, we decided to head west to Marfa and Big Bend National Park. Though Big Bend National Park is in Texas, it took us an entire day's drive to get there. Before heading to the park, we stopped in Marfa and Fort Davis. Read on to hear about our adventures in west Texas!  Chinati Foundation, Marfa, TX MarfaMarfa is an odd town. It is a tiny, dusty, west Texas town, seemingly no different than the other tiny, dusty, west Texas towns. However, it has gained legendary status for a couple of reasons. First of all, in 1971, artist Donald Judd moved to Marfa and created large scale, minimalist art installations there. Now, Marfa is known as a hub for minimalist art. You can visit Judd's minimalist art at the Chinati Foundation, where there are indoor and outdoor art pieces. The pieces play with light, shadow, and angle to create different effects from different perspectives. Inspired by Judd, other minimalist artists have taken up residence in Marfa and have left their imprint on the town. Unassuming storefronts in the town disguise art galleries. We walked into Marfa Book Company, which sold a variety of books, including some about art and Texas. When we walked through a doorway in the back of the shop, Brett and I found ourselves in yet another art gallery. Even if you drive 26 miles outside of town, you'll find Prada Marfa, a permanent sculpture installation. Exploring Marfa is like being in Alice's Adventures in Art Wonderland: just when you think you have the little town figured out, you might fall down a rabbit hole to find a whole new experience with minimalist art. Marfa is also famous for the mysterious "Marfa lights", mentioned in the song "No Spare Parts" by the Rolling Stones. I learned that fun fact from Brett, who loves the Stones. The Marfa lights can be found just outside of town in a specific spot, where there is a viewing platform set up just for visitors who want to see the famed lights. They are glowing orbs that appear to dance, move, converge, and diverge in midair. People have seen the lights since the 1880s and have offered countless explanations, from paranormal phenomena to car headlights to aliens to gases. They do not appear every night, so some would-be viewers drive away disappointed. Unfortunately, on our spring break trip, we did not have time to drive out to the platform and wait for the lights.  Chinati Foundation, Marfa, TX Fort DavisThough we visited Marfa for a day, Brett and I stayed in Fort Davis, which is near Davis Mountains State Park. If you are in the area, go to Davis Mountains State Park. We drove through it at sunset and were amazed at the landscape that was illuminated in pinks and purples. There are hiking trails and camping opportunities in the state park. Fort Davis is unincorporated and tiny, the majority of the town confined to one street. Fort Davis only had a few restaurants, but we were able to find a grocery store for provisions before heading to Big Bend. Though it is a tiny town, staying in Fort Davis gave us a great location for exploring the area. The towns of Alpine and Marfa are an easy drive, Davis Mountains State Park is nearby, the McDonald Observatory overlooks Fort Davis, and Big Bend National Park is a few hours away. We stayed at Mountain Trails Lodge & Outdoor Learning Center, which I highly recommend. Brett and I stayed in one of these cute little cabins, which contained a queen-sized bed, kitchenette, and porch. I really enjoyed the breakfast that was included in our room rate. It was a hearty, home-cooked meal. We could help ourselves from the buffet and savor the meal at brightly colored tables and chairs in the dining room. The main lodge and dining room had huge framed maps of Texas from centuries past, when it covered more territory and when it was its own country. I adore maps and, not being familiar with Texas state history, found them fascinating. With breakfast, they served coffee from Big Bend Coffee Roasters in Marfa. There was something that felt very adventurous and exciting about holding my warm coffee that was locally roasted and looking out the window at the desert landscape, planning that day's adventure. It felt very full of possibilities.
McDonald ObservatoryGo to a Star Party. I cannot recommend this highly enough. Should I say it again? Go to a Star Party. Brett and I visited McDonald Observatory one night for a Star Party, and it was our favorite activity on the whole spring break trip. McDonald Observatory is located in the Davis Mountains, over 400 miles from Austin, but it is still property of the University of Texas at Austin. The observatory sits far out in west Texas, on top of a mountain, where there is little to no light pollution. The observatory hosts Star Parties a few nights a week, led by astronomers, for the general public to learn about the objects in the night sky. We began our party in an amphitheater. The presenter has a laser light that he used to point out stars, planets, nebulas, and constellations. Now, I don't get very excited about technology but the laser was cool. It seemed to extend all the way to the actual objects, so the presenter could circle stars and connect them to make constellations. If you go to a Star Party, remember that the McDonald Observatory is in the northern Chihuahuan Desert, and it can get cold at night. We went in March, brought coats and gloves, and still had to ask the family next to us to borrow a blanket. Despite the cold, we loved the orientation to the night sky and hearing facts about outer space. After the presentation, we had the opportunity to look through various telescopes at the observatory, staffed by University of Texas at Austin students. I saw a close-up view of the moon's surface, craters and all. I also saw Jupiter and its famous spot. I was able to see a few nebulas, though I can't remember the specific names. When you live in the city, sometimes you forget how much the night sky is affected by light pollution. It was really amazing to experience the night sky in the Davis Mountains, where the velvety blackness was packed with brightly lit stars. 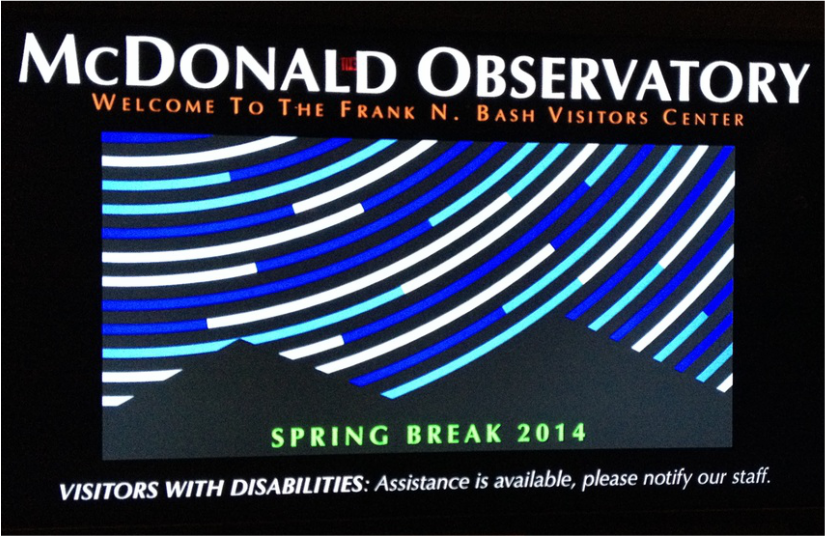 STAR PARTY at the observatory! Big Bend National ParkFrom Fort Davis, Brett and I headed down to Big Bend National Park, which lies on the Rio Grande River, just north of the Mexican border. Big Bend is a desert park, but it contains a wide variety of landscapes, from desert plants to the Chisos Mountains to the Rio Grande River. Visitors can camp at one of three campgrounds (Chisos Basin, Cottonwood, Rio Grande Village) or at primitive backcountry sites. Or if hotels are more your speed, you can stay at the Chisos Mountain Lodge. Brett and I chose to camp in the Chisos Basin campground, since we both prefer to be up in the mountains. The campground sits in a basin, so peaks of the Chisos Mountains rise up around the campsites. Our favorite part of the park was the Chisos Mountians. However, another beautiful natural feature is the Santa Elena Canyon, created by the Rio Grande River flowing through it. Many visitors choose to swim in the river or to take guided river rafting trips through the canyon. Fun fact about Big Bend National Park: "In 2012, the park was named as an International Dark Sky Park by the Internationsl Dark-Sky Association, which recognized the park as one of only ten places on the planet certified for dark sky stargazing. In addition, the Association recognized the park as having the darkest measured skies in the lower 48 United States. " (Wikipedia) 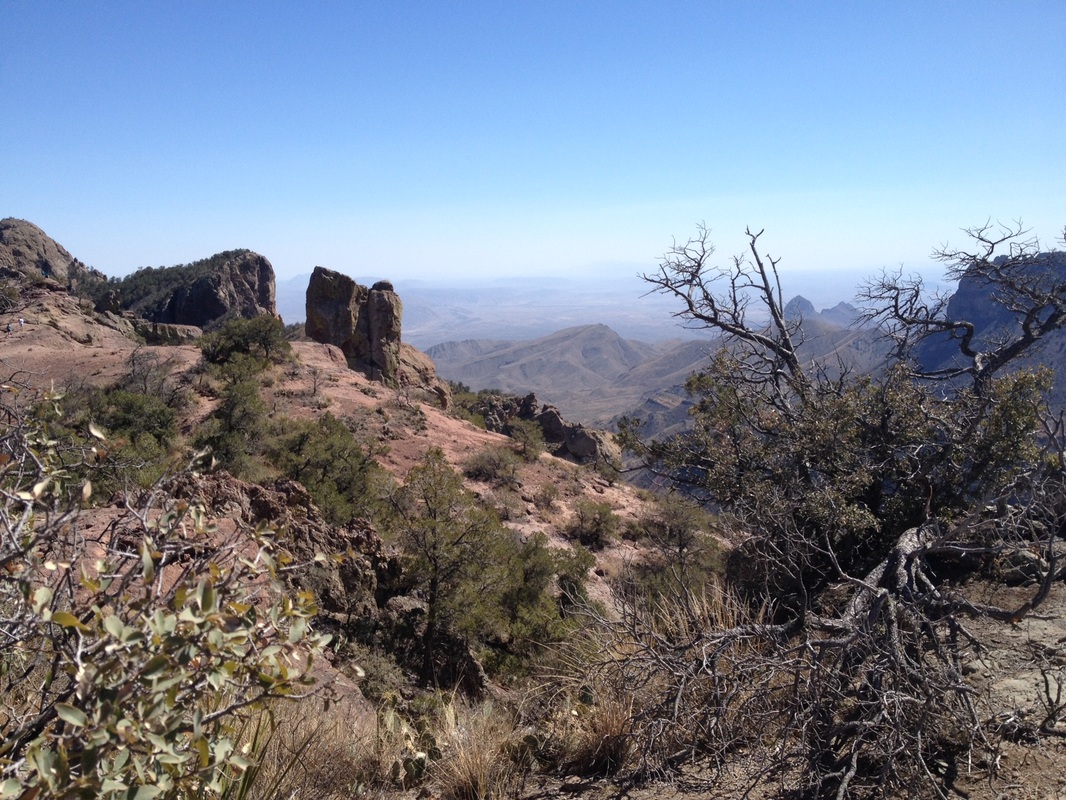 Big Bend National Park, seen from Lost Mine Trail 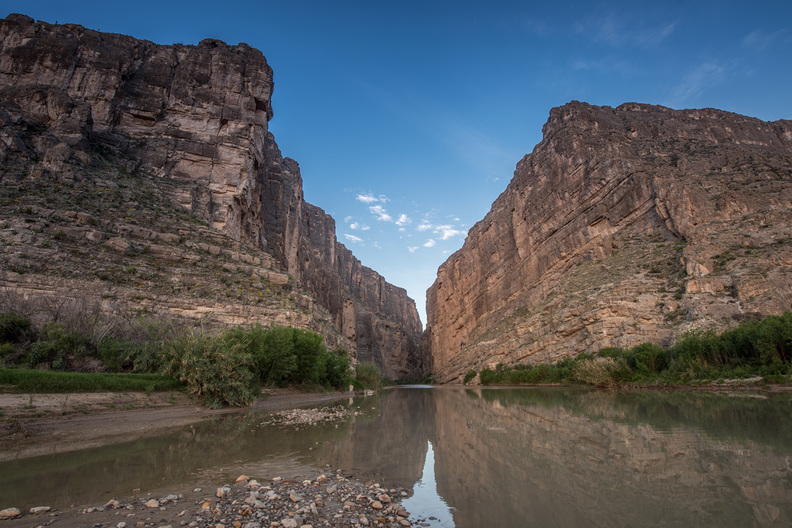 Santa Elena Canyon II / Steven Leggett / CC BY-NC-SA 2.0 Lost Mine TrailLooking at the map of trails for a moderate hike, Brett and I chose the Lost Mine Trail in the Chisos Mountains, which is 4.8 miles round trip. The trail was moderately difficult, with some steep sections. The Lost Mine Trail wound up to a beautiful overlook, where we could see the Chisos Mountains, the desert, and beyond into Mexico. At the top, we rested, enjoyed some water and energy bars, and took in the expansive views. We were able to do the whole trail, round-trip in a few hours one afternoon. At the trailhead, signs warned us of crossing paths with wildlife, including mountain lions, but Brett and I saw no trace of wildlife other than birds. Though we passed other people on the trail, it was not overly crowded, despite us visiting during spring break. A great hike in the park for people who want a little bit of a challenge but don't want to commit all day to one of the more strenuous hikes, like South Rim or Emory Peak. For some other trail suggestions, visit the Big Bend National Park website to see mountain hikes, desert hikes, and river hikes. 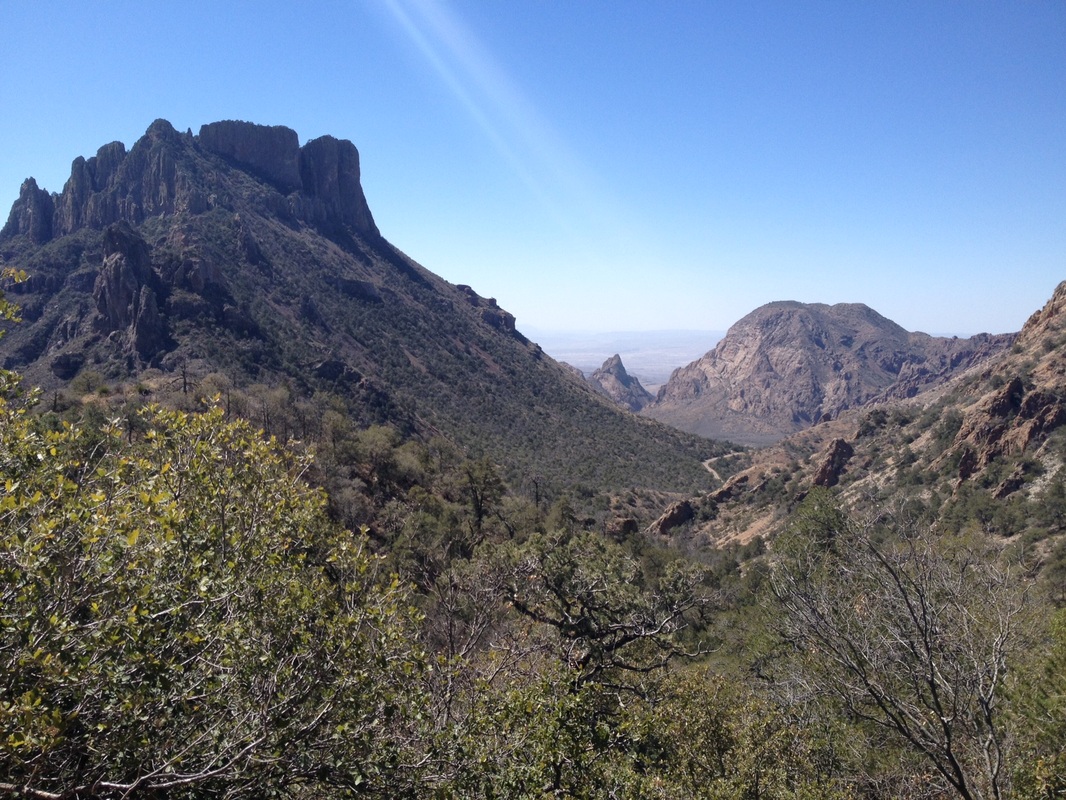 Big Bend National Park, seen from the Lost Mine Trail 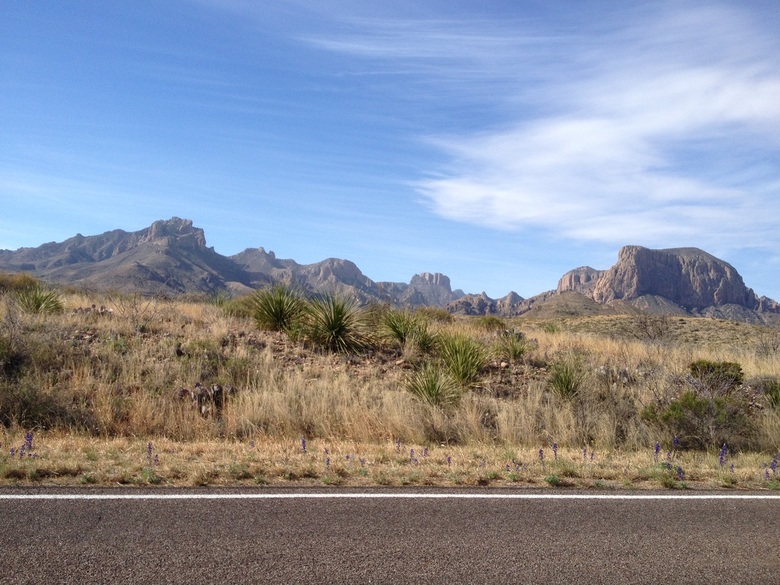 Chisos Mountains and desert plants from a park road Window View TrailThis trail is not about the hiking; rather, it's about the view at the end. The Window View Trail is only about a quarter of a mile, and the path is paved. It leads to "the window", a view between the peaks of the Chisos Mountains that is perfect for watching a Big Bend desert sunset. As the sun sinks behind the mountains, the sky is painted with hues of yellow and orange, framed by dark, jagged rocks. There are benches to sit on while watching the sunset, and be sure you have a flashlight or headlamp for the way back, as the path is not well lit after dark. Viewing the sunset at the window is the perfect ending to a day outdoors at Big Bend National Park.  The beginning of the Window View Trail at dusk  Sunset at the window in Big Bend National Park  View from the top of Angel's Rest in the Columbia River Gorge  Small confession since I'm half-way through my Portland trip description: prior to spring break, I was a little hesitant about the Pacific Northwest. See, I lived in Seattle for three months (February, March, and April) for a graduate school internship. Before I left for Seattle, everyone said to me, "It's going to be really rainy. I hope you like rain." And, in my head, I thought, "I like rain! I'll curl up with a book and a blanket, listening to the sound of the rain on the roof." Then, I arrived in Seattle and all those rainy day dreams were washed away. First, when it's always rainy, you have to run errands, go to work, and do real life things. You can't just curl up with a book all day. Second, the rain in Seattle is not like rain I have experienced in any other location. It doesn't rain down for 2-3 hours and then clear up. Instead, the rain hangs over the city in a misty drizzle all day, making everything damp and chilling you to the bone. Also, I didn't have many friends, since I was only there for 3 months, so I was either hanging out inside by myself, waiting for the misty drizzle to pass, or running errands by myself in the misty drizzle. However, I am so glad that I gave the Pacific Northwest another chance during our trip to Portland. Even though it was the same time of year and it was still rainy, we powered through with our raincoats, not caring if we got wet. On this trip, I was able to admire how everyone continues to play in Portland even in wet weather. And, you know what? I learned that there is a sense of camaraderie in braving the rain together for the Shamrock Run or the Timbers game. The rain even added to the experience in certain instances. In the previous post, I described all the coffee shops we tried, Powell's City of Books, the Shamrock Run, and the Portland Timbers game. In this post, I will cover the Columbia River Gorge and all the restaurants we tried. Our group decided to take advantage of the glorious weather (60s and sunny) to accomplish another item on my "must do" Portland list: hiking. One of the best things about the Pacific Northwest is the abundance of outdoor activities within easy distance from the major cities. My friend recommended that we head to the Columbia River Gorge and hike to Angel's Rest. The drive to Angel's Rest from southeast Portland took us less than 45 minutes. It's a 2.3 mile hike one way. I wouldn't describe the hike as "easy", since it is uphill for 2.3 miles and there is a small portion of the trail near the top where there are rocks to walk over rather than a well-defined dirt trail. As we hiked up, I was in awe of the vibrant green colors, the sound of nearby waterfalls, and the amazing scent of the Douglas Fir trees. Let me tell you, pine scented candles are nice, but nothing compares to the real thing in the crisp Oregon air. The views of the Columbia River are gorgeous from the top as well. If you need convincing, just take a look at the photo on the top of this post. There are also some wonderful natural spaces within the city limits of Portland, such as Mt. Tabor Park. Mt. Tabor Park is on a hill overlooking Portland and contains many trees as well as green space within the city. 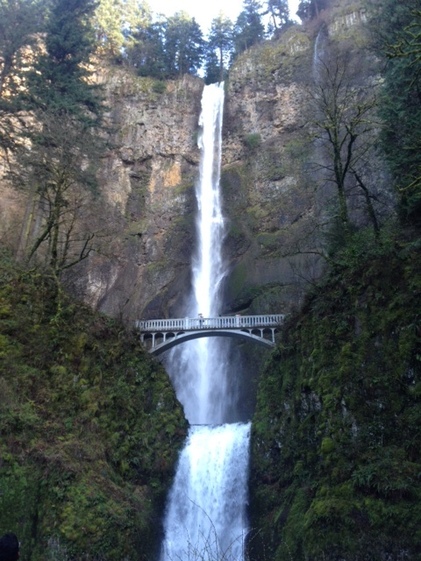 Multnomah Falls We also visited Multnomah Falls, which was near the trailhead to Angel's Rest. For those who don't want a long hike but still want to see some of the natural beauty of the area, Multnomah Falls is a great choice. The walk up to the bridge that crosses the falls is only a quarter of a mile, and you can feel the spray from the falls. It's really amazing to see and hear the power of the water thundering down!
 Cider at Bailey's Taproom Cider at Bailey's Taproom Another great aspect of Portland is the variety of delicious healthy and ethnic foods available at restaurants. We appreciate options for allergy-friendly dining, since I am gluten-free and Brett has a severe dairy allergy. Luckily, our friends knew some great places to take us for good food. Portland has some huge food truck parks as well, where there are options for everyone and an outdoor dining area in the middle of the food trucks! Here is a list of the restaurants we sampled during our trip:
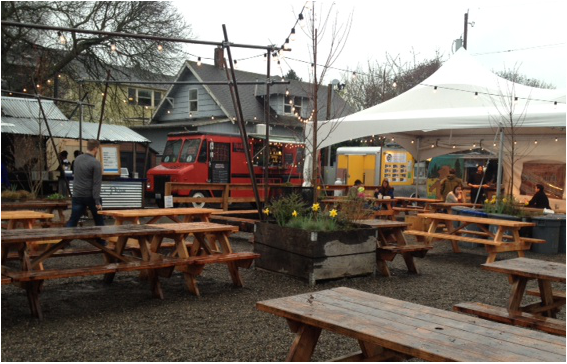 Food Truck Pod on SE Division It was hard to say goodbye to Portland. I truly enjoyed my time there, despite the rainy days. I enjoyed seeing my college roommate and her husband. I loved the healthy, delicious food options and amazing coffee shops. I cheered with the Timbers Army at the game. I hiked up to Angel's Rest and soaked in the views of the Columbia River Gorge. I relished browsing the shelves and shelves of books at Powell's. The people in Portland were friendly and eclectic, and, even in the city, the plants are vibrantly green. They say "Keep Portland Weird" (a familiar slogan to those of us here in Austin), a reference to the eccentricities of the city as well as individuality in expression and lifestyle of its residents. The last picture that I took on the trip is below. It features the famous carpet at the PDX airport. When we arrived, my husband and I commented that the carpet was ugly. During our trip, we learned that it's beloved in Portland, and it is a tradition to take a picture of your feet on the carpet. We learned that it's kind of a symbol of the city. Something familiar and comforting to send people off on a trip and to welcome them back home to Portland. People have PDX carpet tattoos. They make PDX carpet socks and other gear. They're tearing out the famous carpet and replacing it, so it will be gone by November 2015. By the time we left, after experiencing the city, it was a little bittersweet to see the PDX carpet under my feet. It did feel a little like an old friend saying goodbye. The next time we fly to Portland, the PDX carpet will be gone, but I have no doubt that the spirit - something weird, cool, and uniquely Portland - will still be there to welcome us back. 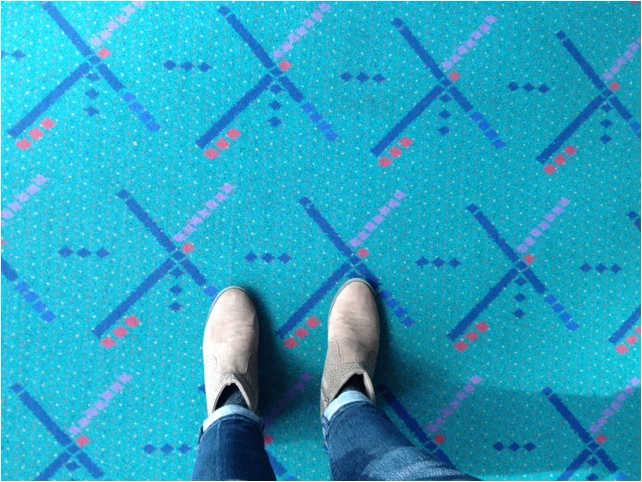 Famous PDX Carpet |
AuthorMy name is Alyssa Good and I have a passion for travel, adventure, culture, and new experiences! I focus on budget friendly travel, trip planning resources, and seeking out new experiences. Archives
December 2017
Categories
All
|


 RSS Feed
